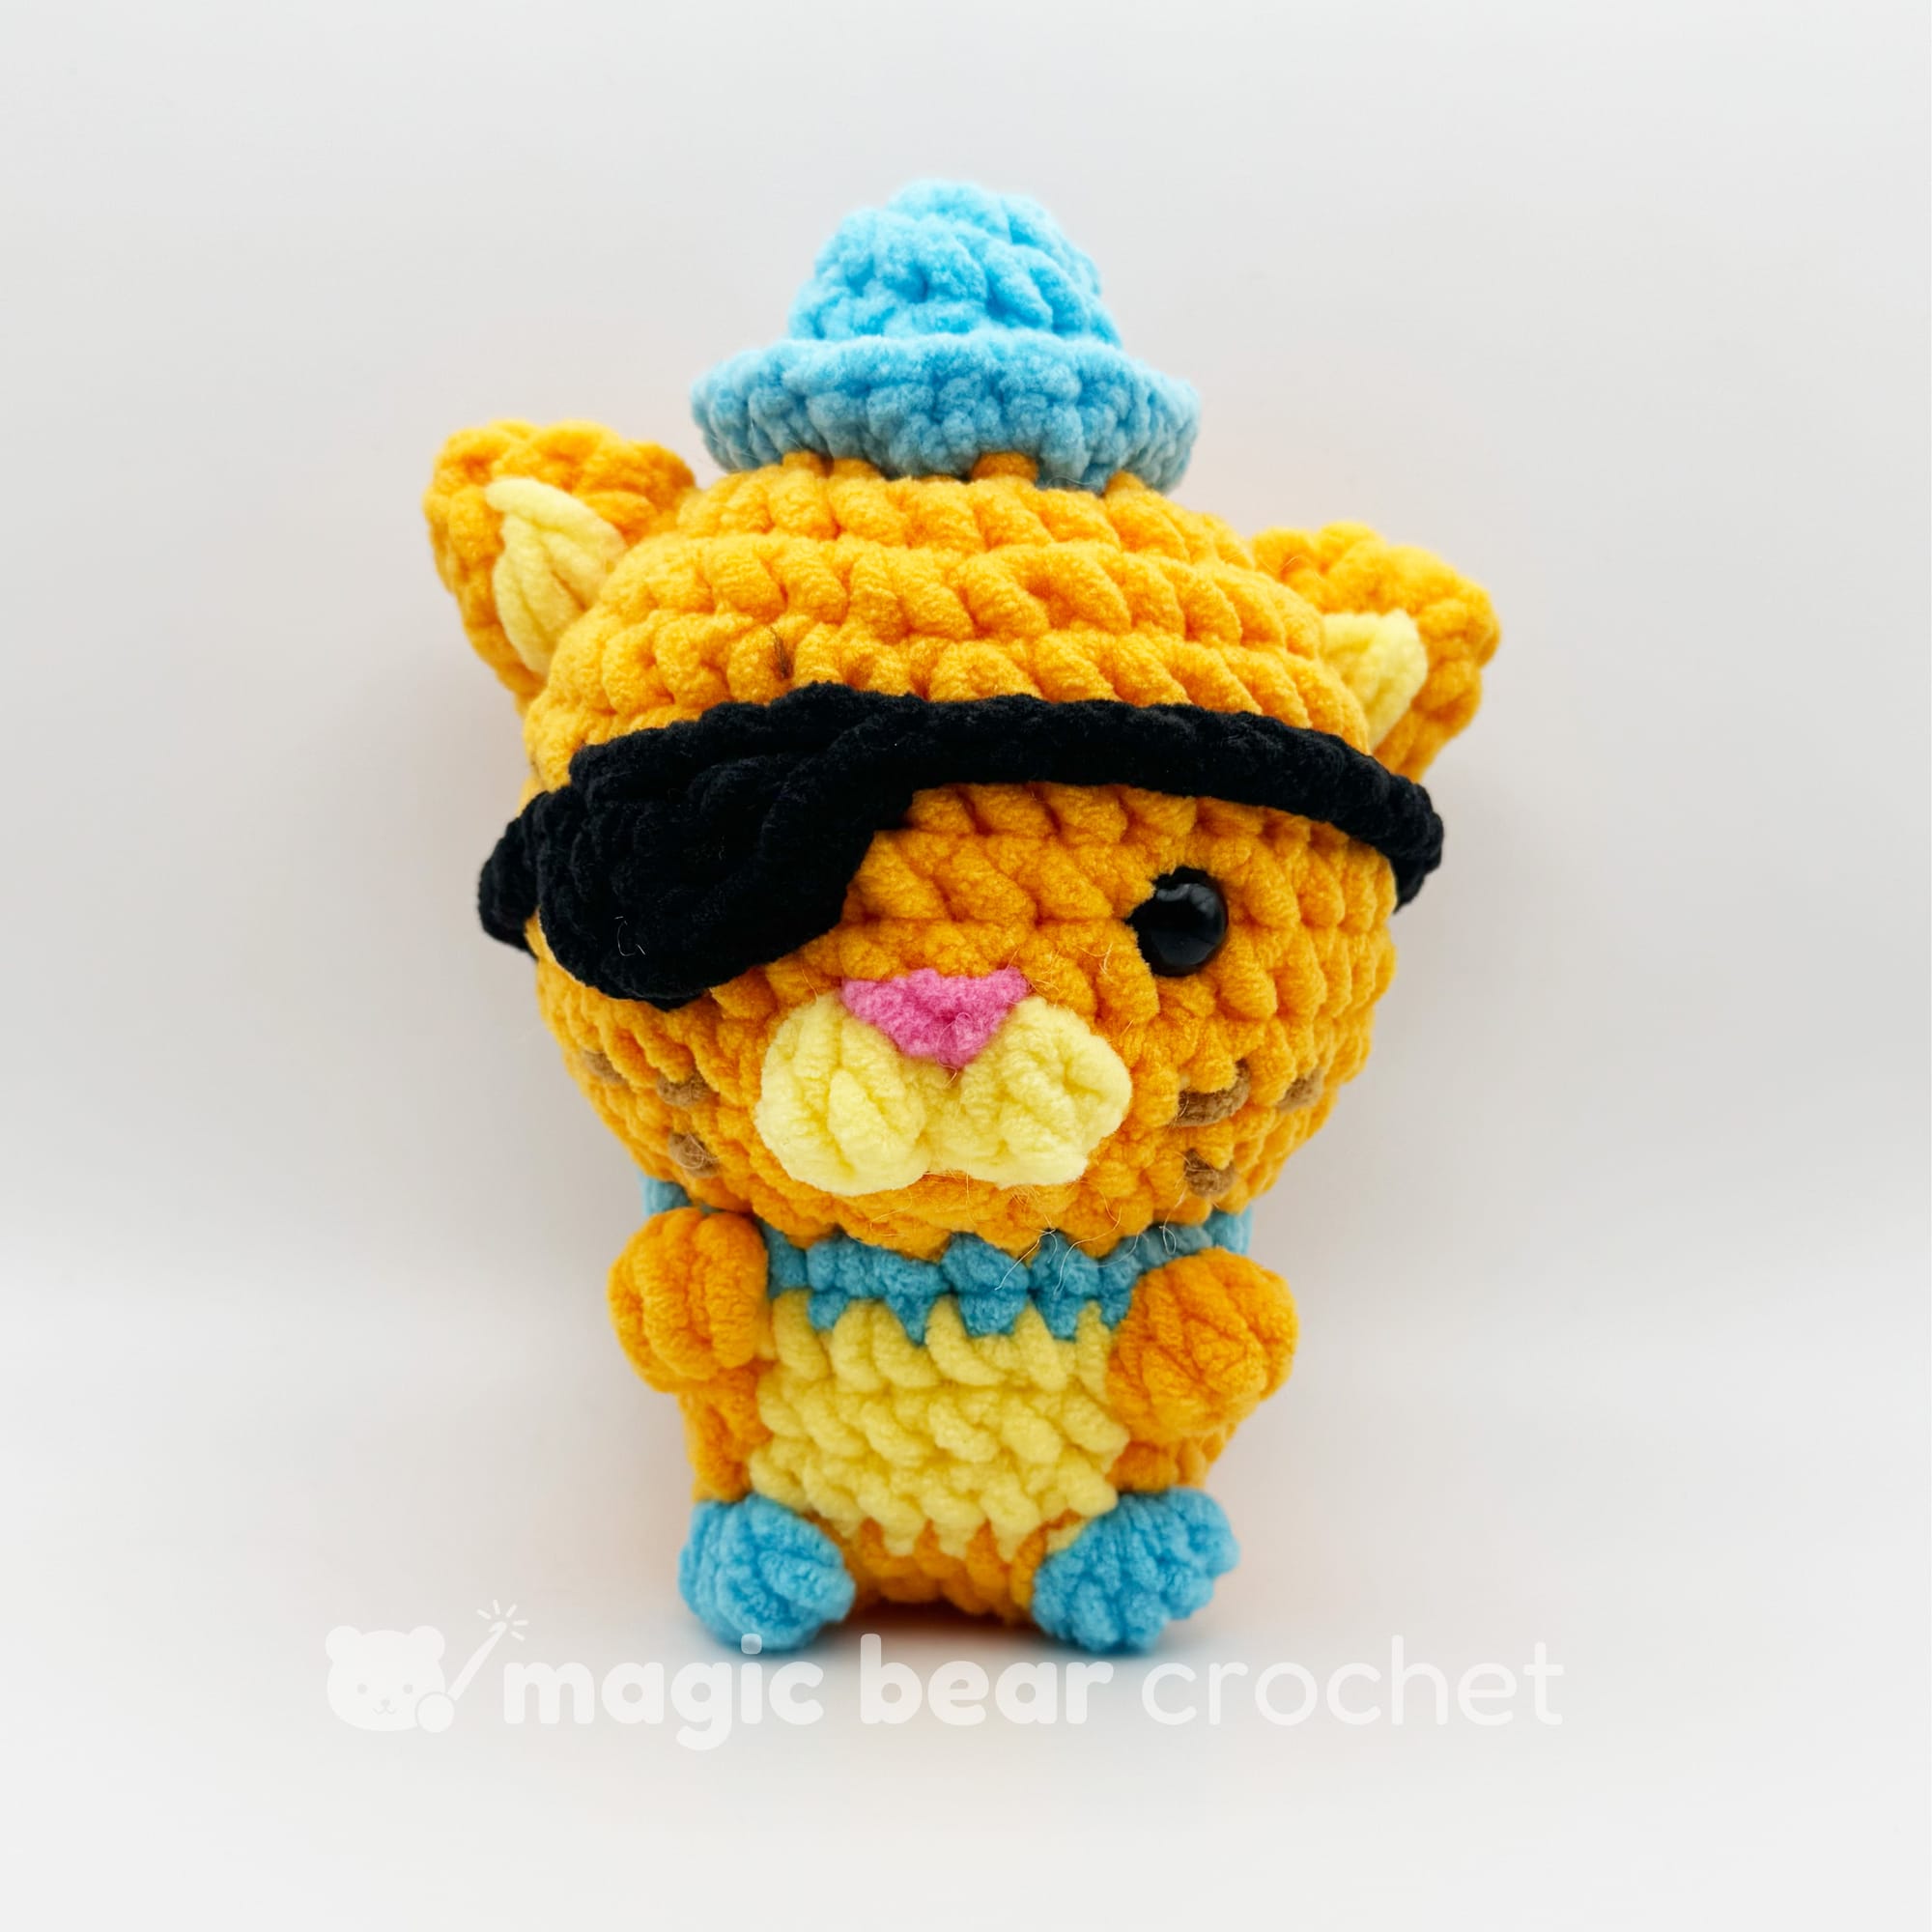
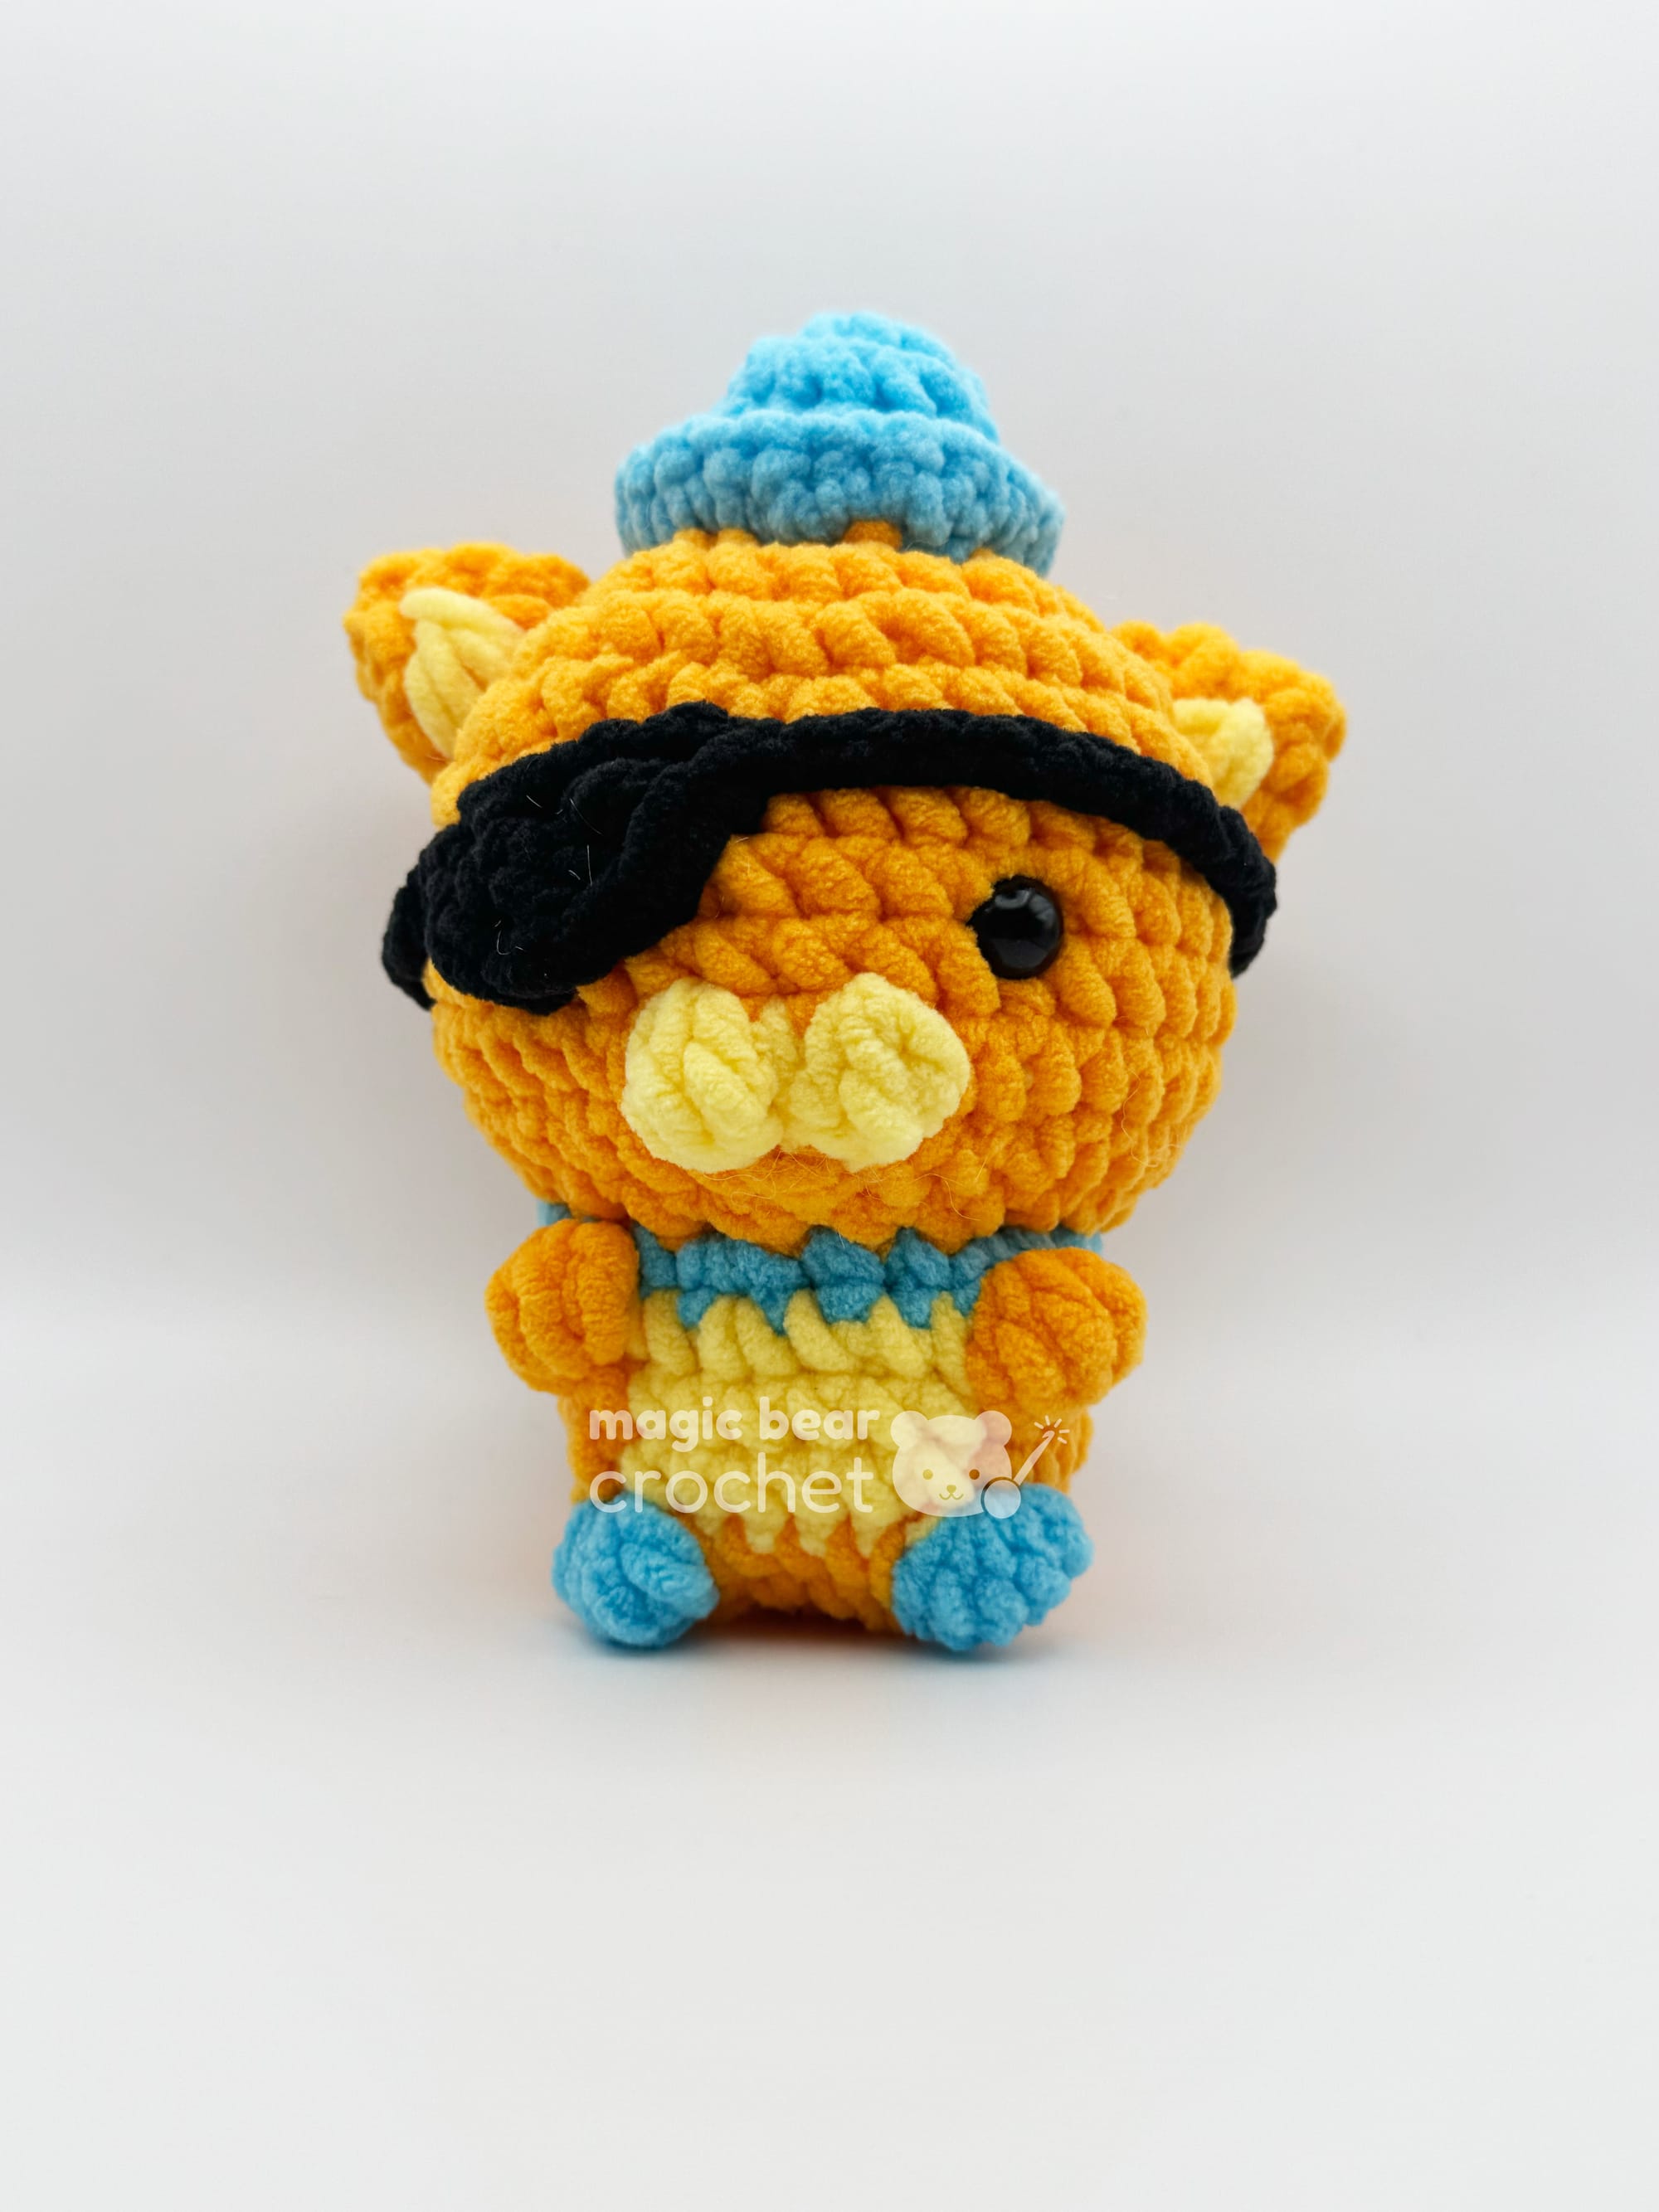
Kwazii the Pirate Cat from Octonauts - Amigurumi Crochet Pattern


Ahoy, crocheters! Set sail on a crafting adventure with this charming Kwazii the Pirate Cat amigurumi pattern. This brave feline captain features distinctive details like a dashing eyepatch, a jaunty blue hat, and an expressive face complete with adorable freckles. Whether you're making it for a little one who loves ocean adventures or adding to your amigurumi collection, this pattern provides clear, step-by-step instructions to bring this seafaring friend to life.
This design combines classic amigurumi techniques with special details like color changes and embellishments to create a character full of personality. The finished Kwazii stands approximately 6 inches tall, making him the perfect size for imaginative play or display.
Skill Level and Time Investment
Skill Level: Intermediate
- Perfect for crocheters who can:
- Work in continuous rounds
- Make color changes
- Create basic embroidery stitches
- Work bobble stitches
- Make invisible decreases
Time to Complete:
- Total time: 3-4 hours
- Break it down into manageable sessions:
- Head and face: 1 hour
- Body and tail: 1 hour
- Hat and eyepatch: 30 minutes
- Ears and assembly: 30-60 minutes
Materials List
Yarn Requirements
Recommended Yarn: Big Twist Posh (Bulky Weight/Category 5)
Main Colors:
- Orange - 50g for main body
- Blue - 25g for hat and details
- Yellow - small amount for details
- Black - small amount for eyepatch
Accent Colors:
- Pink - small amount for nose
- Tan - small amount for freckles
Tools and Notions
Essential Tools:
- 4.00mm crochet hook (US G/6)
- Tapestry needle for sewing
- Stitch markers (at least 2)
- Scissors
- 10mm safety eyes (2)
- Polyester fiberfill for stuffing
Project Details
Finished Size
- Height: approximately 6 inches (15 cm)
- Width: approximately 3 inches (7.5 cm)
Gauge
- Gauge is not critical for this project, but aim for tight, even stitches to prevent stuffing from showing
- Using suggested hook size, stitches should be approximately 6-7 sc = 1 inch
Abbreviations and Techniques
- ch: chain
- sc: single crochet
- dc: double crochet
- inc: increase (2 sc in same stitch)
- dec: invisible decrease
- sl st: slip stitch
- FLO: front loops only
- bobble-3-dc: 3 double crochet bobble stitch
- bobble-5-dc: 5 double crochet bobble stitch
- [ ]: stitch count at end of round
Pattern Notes
- Work in continuous rounds unless otherwise specified
- Use stitch markers to track beginning of rounds
- Stuff firmly as you go
- When changing colors, complete the last yarn over of the previous stitch with the new color
Detailed Instructions
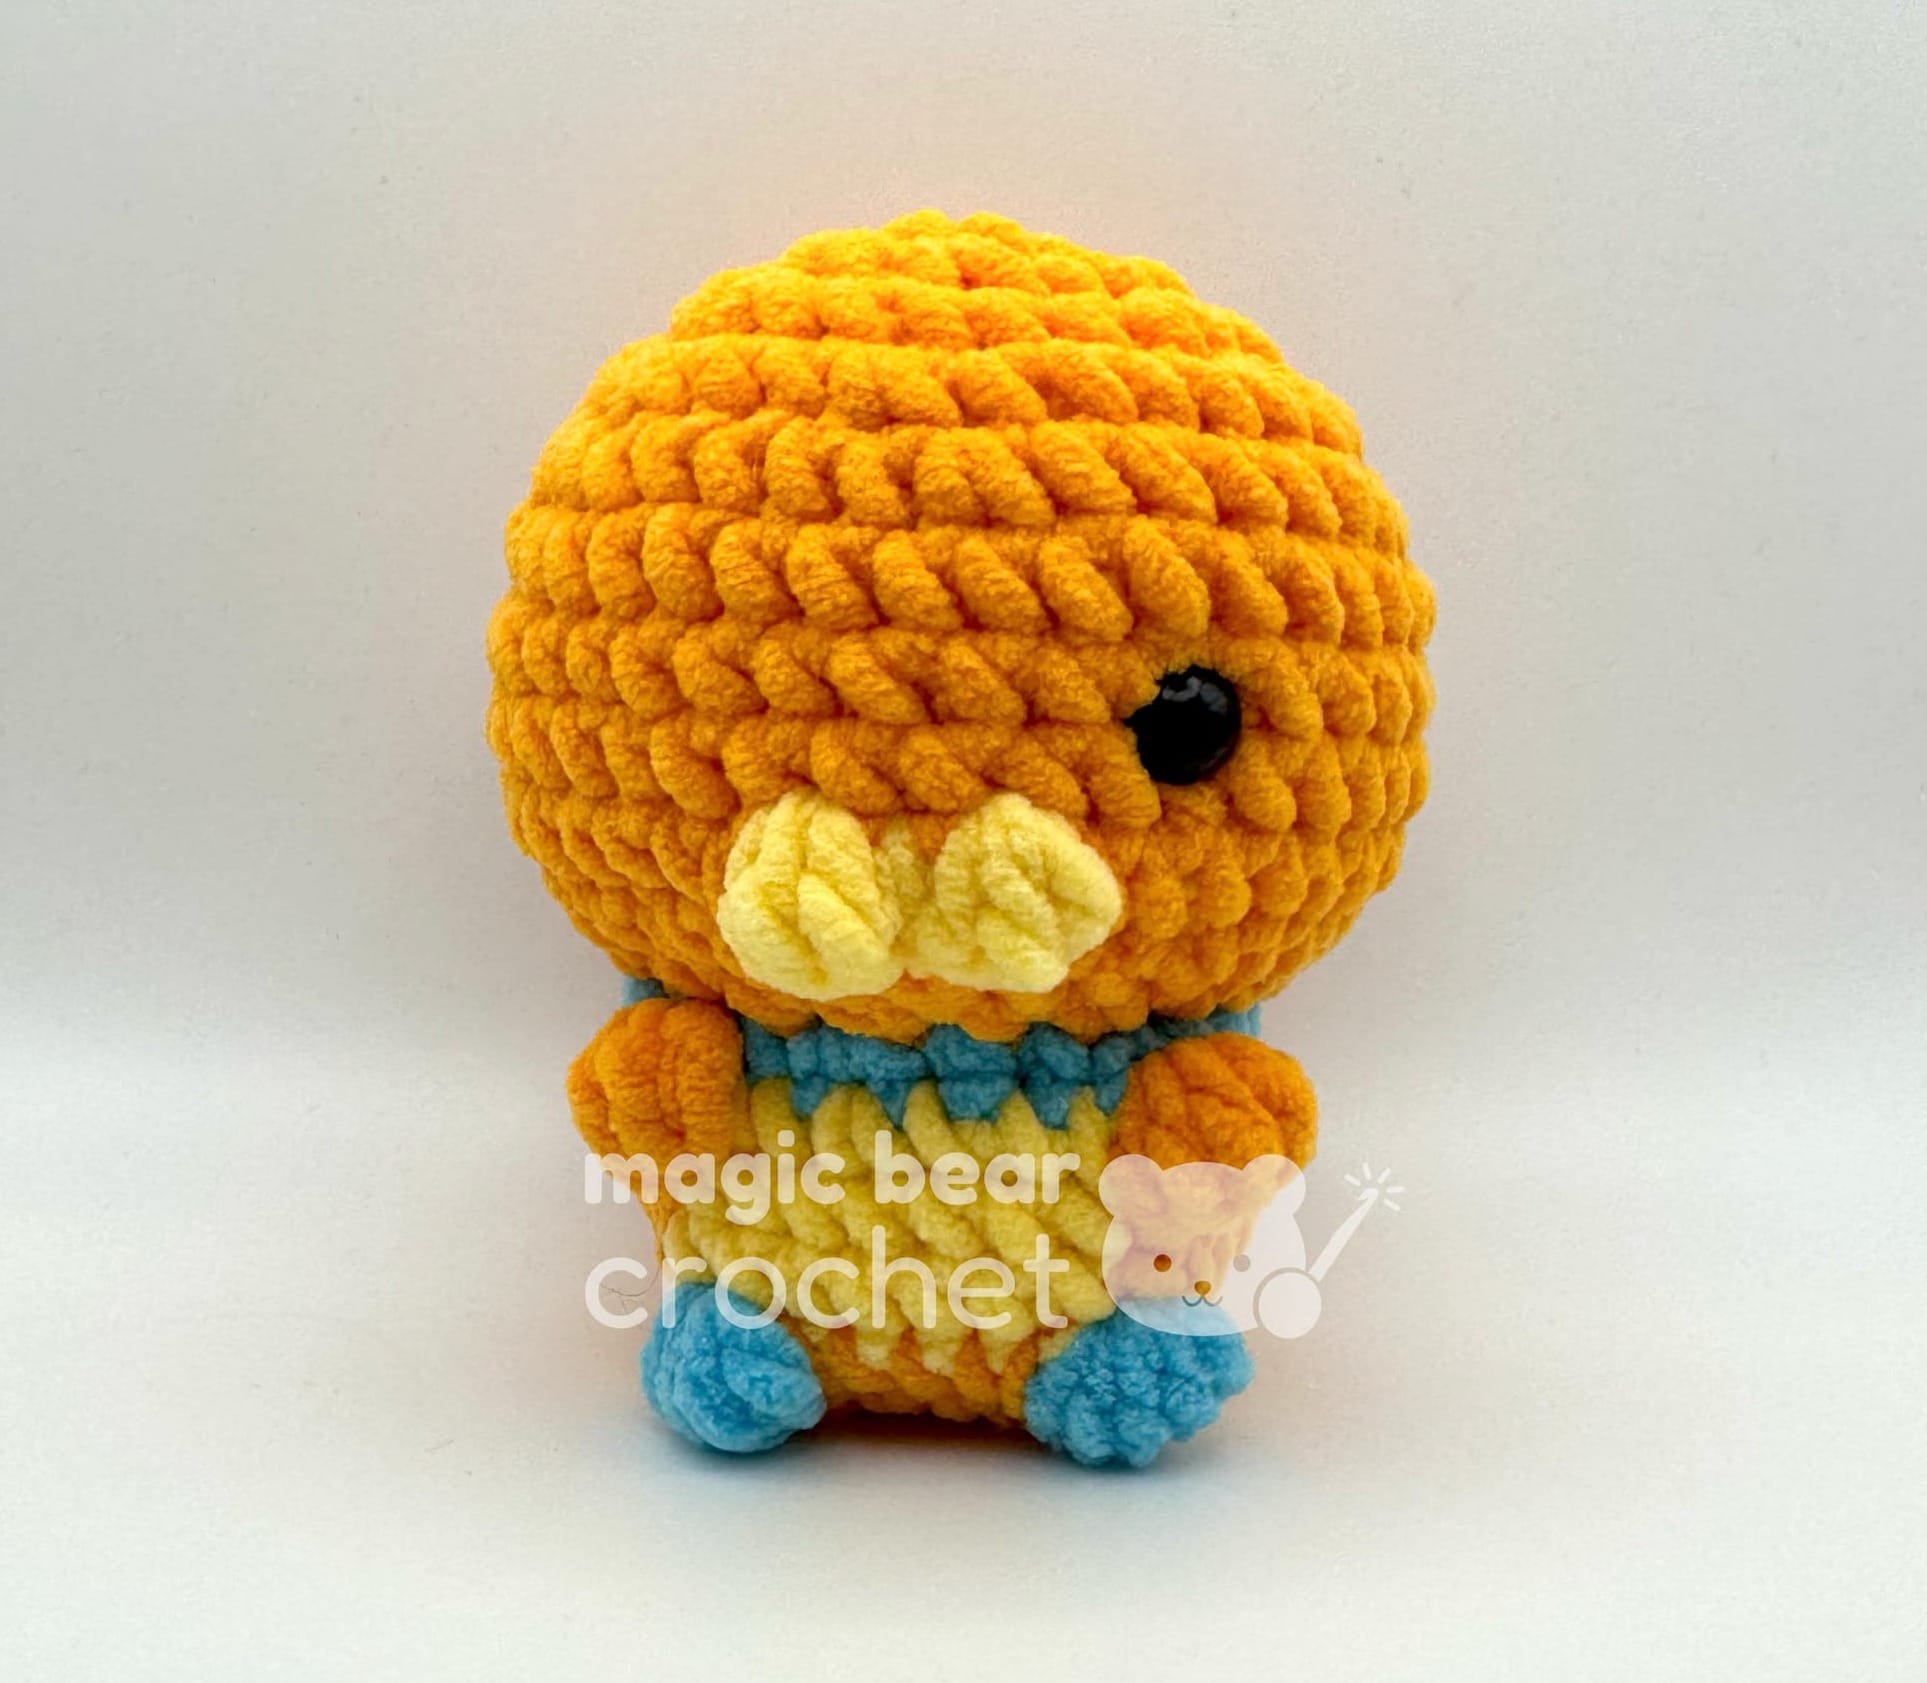
Head and Body
Begin with orange yarn. Work in spiral rounds.
Head:
Rnd 1: 8 sc in the magic ring [8]
Rnd 2: 8 inc [16]
Rnd 3: (1 sc, 1 inc) * repeat 8 times [24]
Rnd 4: 1 sc, 1 inc, (2 sc, 1 inc) * repeat 8 times, 1 sc [32]
Rnd 5: 3 sc, 1 inc, (5 sc, 1 inc) * 4 sc [37]
Rnd 6 - Rnd 8: 32 sc [37] [3 Rounds]
Rnd 9: 17 sc, 1 bobble-3-dc in yellow, 1 sc in yellow, 1 bobble-3-dc in yellow, 17 sc [37]
Rnd 10: 37 sc [37]
Rnd 11: (2 sc, 1 dec) * repeat 9 times, 1 sc [28]
Rnd 12: (1 dec, 1 sc) * repeat 8 times, 1 dec [19]
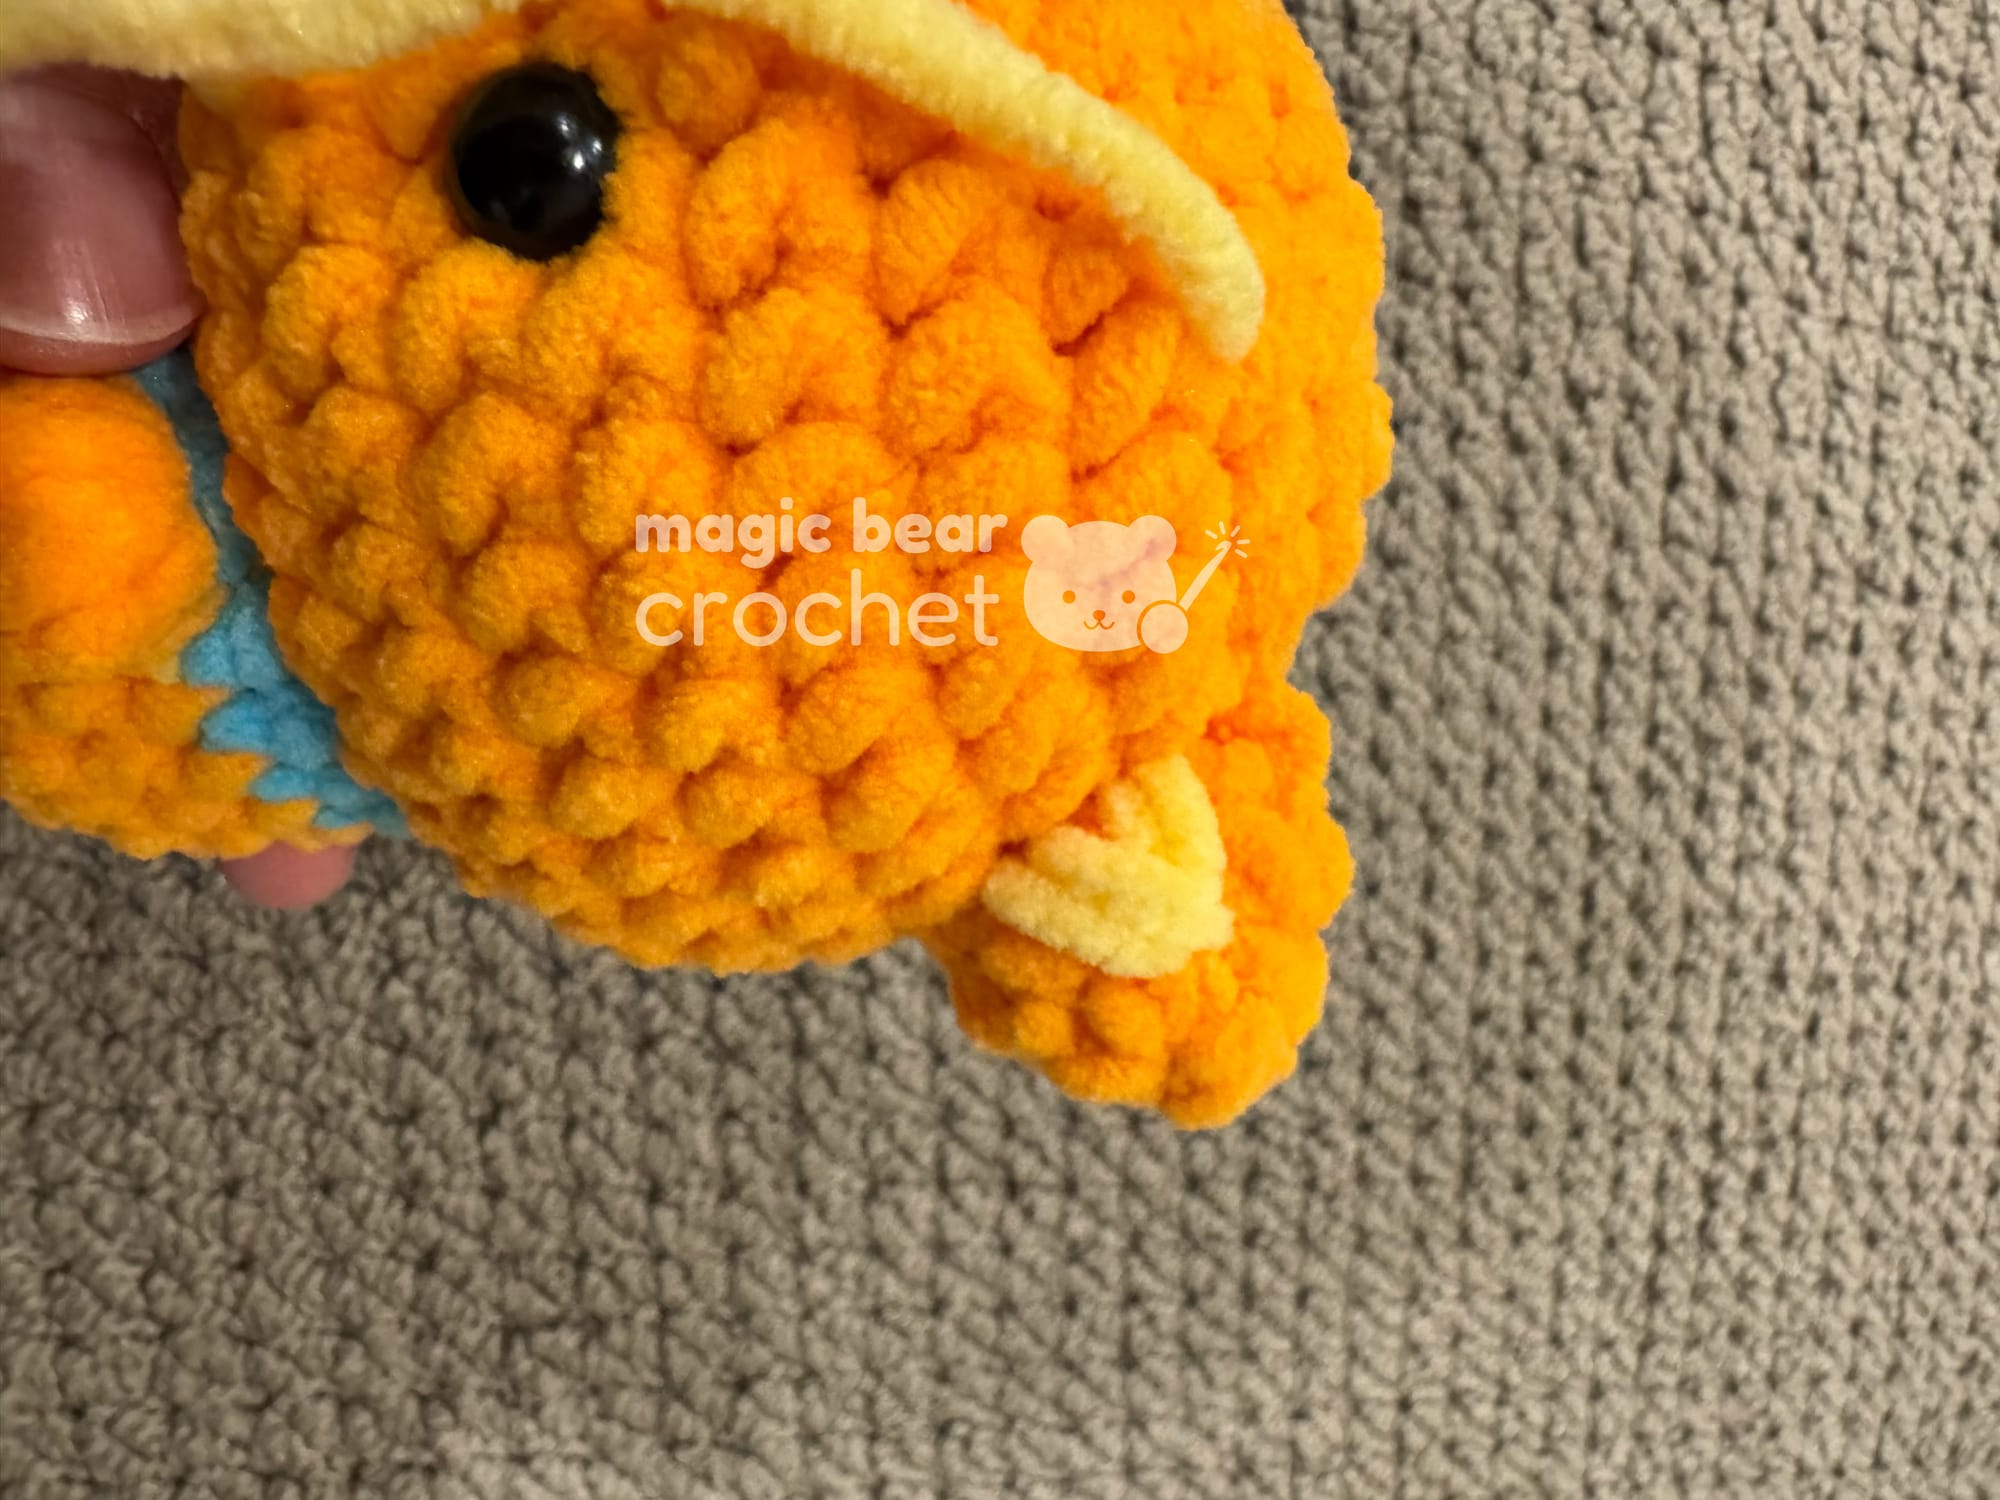
Important: Place one safety eye between Rnd 7 and Rnd 8, about one stitch away from the edge of the snout. If you prefer to make the eye patch removable or liftable (as Kwazii often does), you can add another eye on the other side. I had planned to affix the eye patch directly so I opted not to add the other eye.
Stuff the head firmly at this point.
Face Details:
- Nose: With pink yarn, sew an upside-down triangle shape (2 stitches long horizontally, and two diagonal lines meeting 1 stitch below) above the snout.
- Bottom lip: With orange yarn, sew two lines about 2 stitches long in the center under the snout.
- Freckles: With tan yarn, add small stitches for freckles
Fasten off with invisible join.
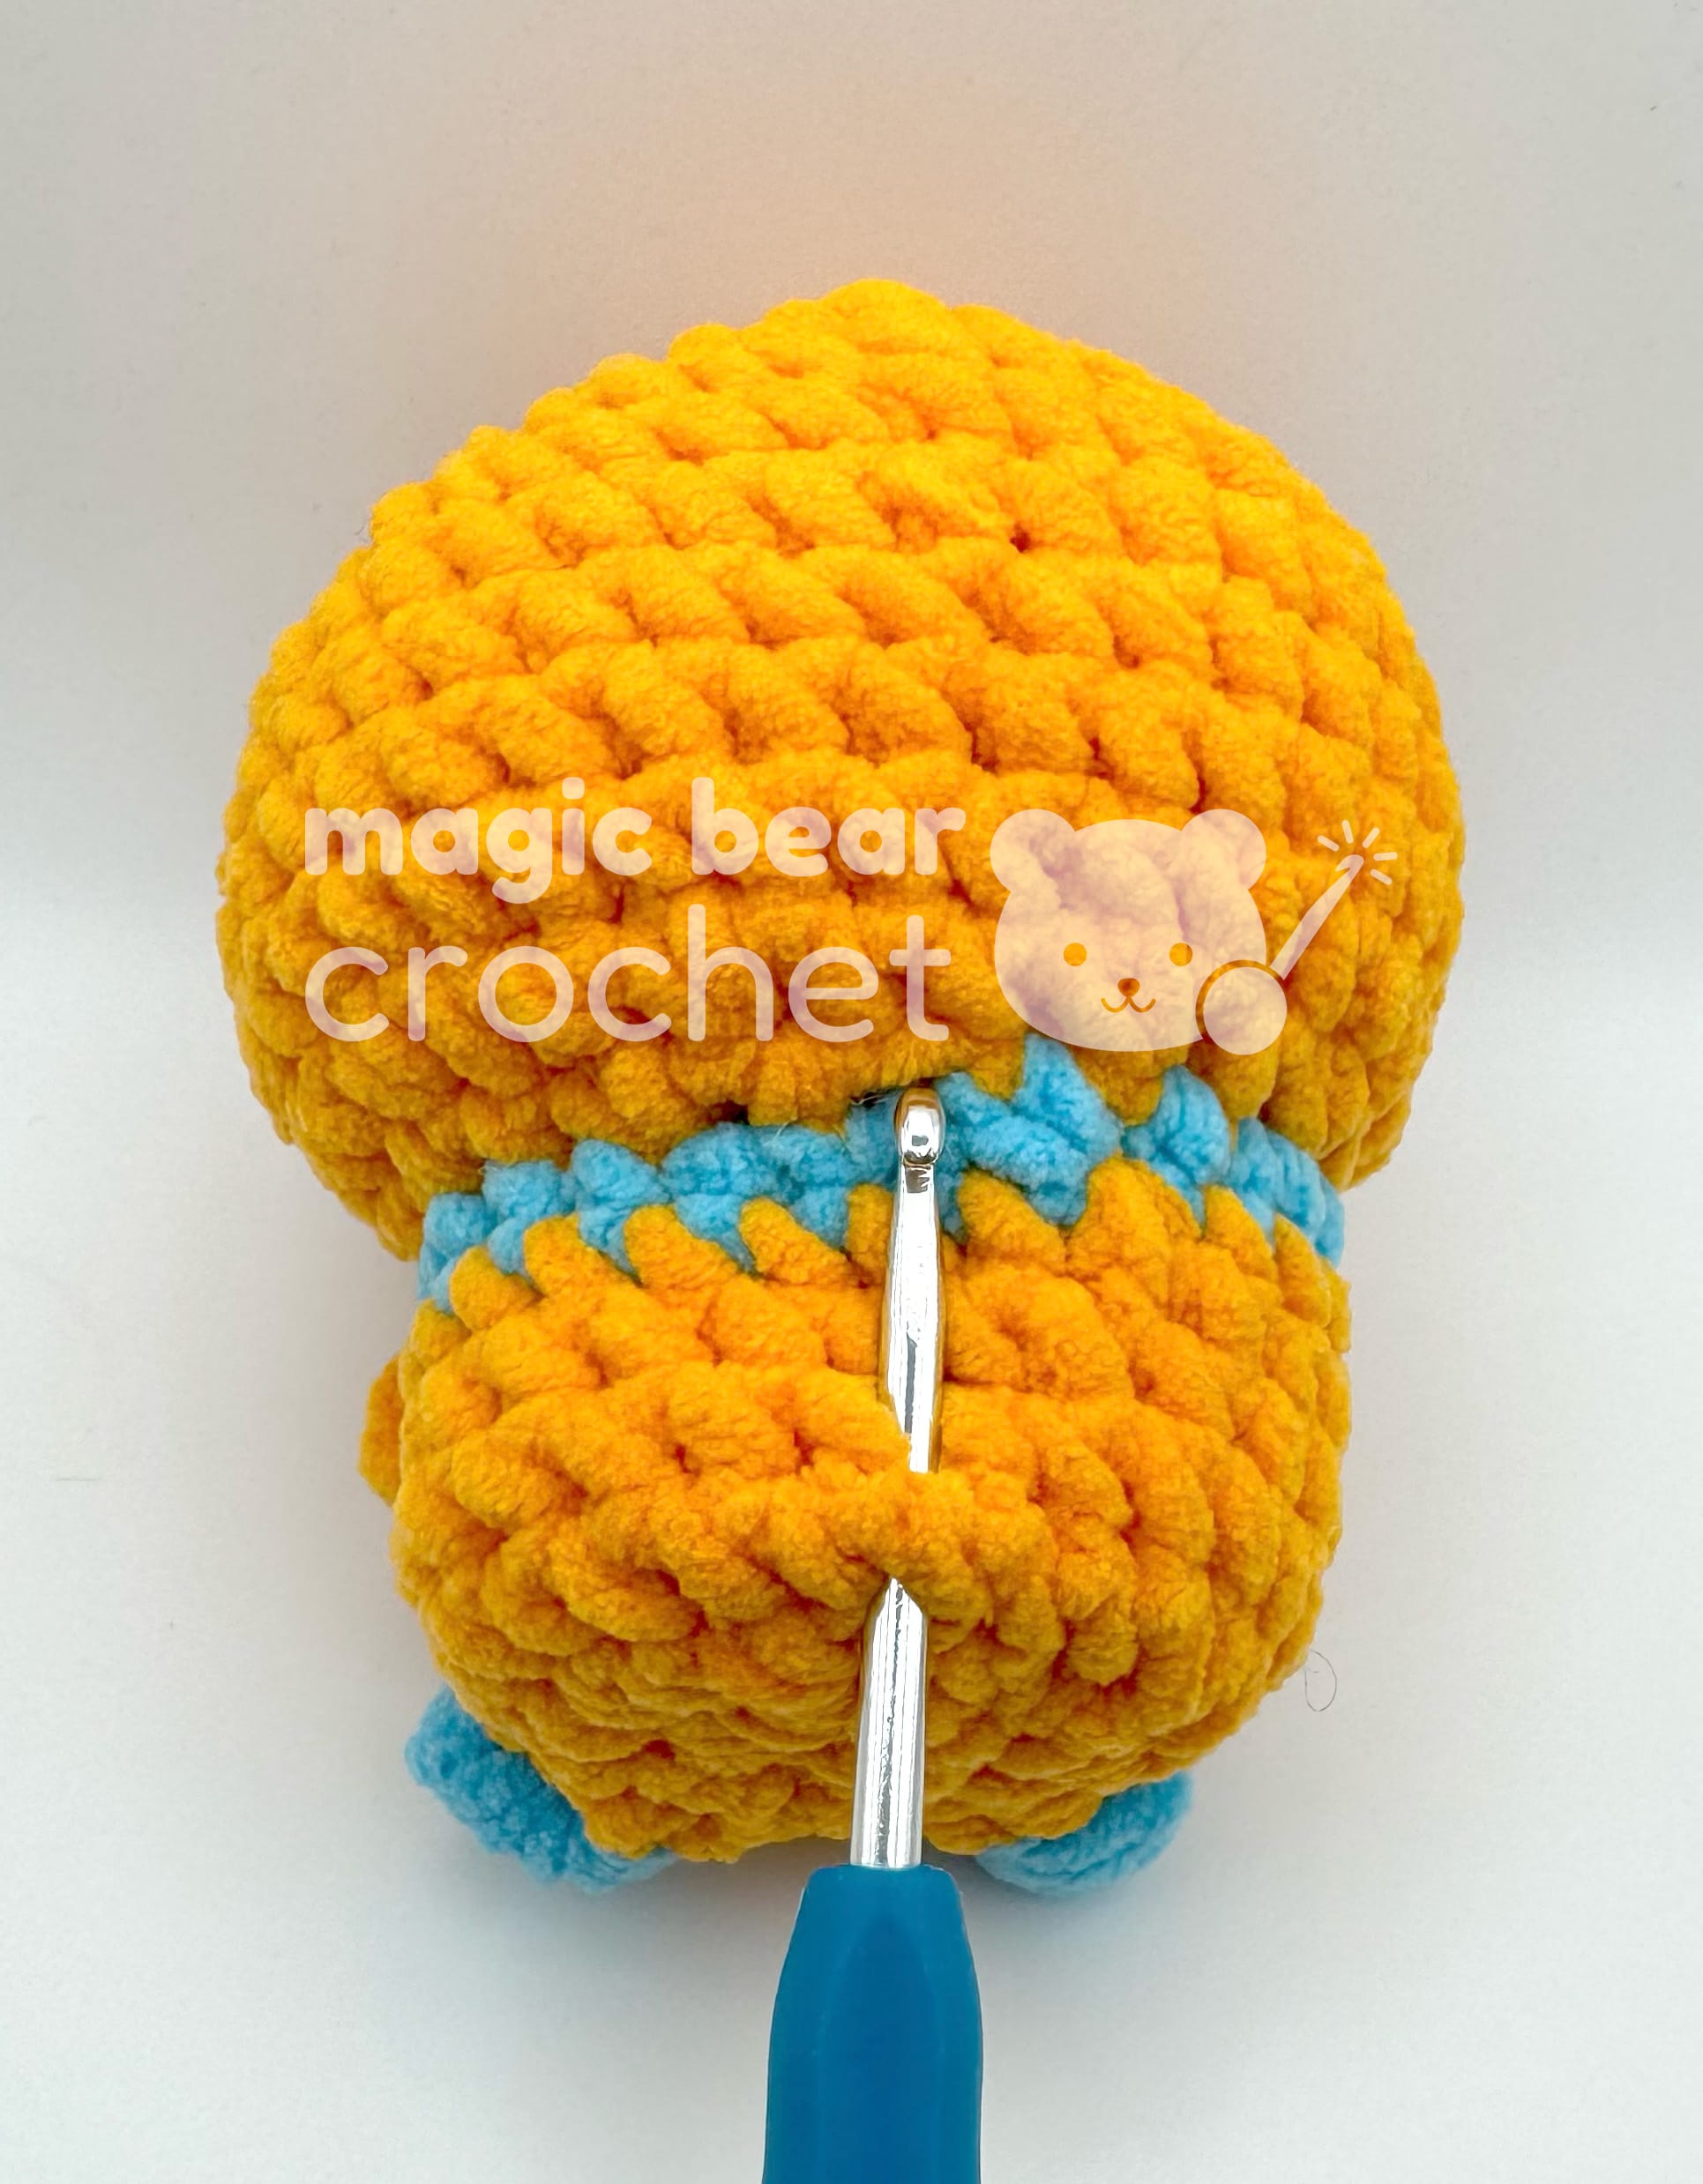
Body:
Rnd 13: This row is worked in front loops only. Switch to blue yarn, starting on the invisible join (it's the diagonal stitch), ch1, FLO (2 sc, 1 inc) * repeat 6 times, 2 sc. The last stitch should go into the same stitch as the first stitch where you pulled up the loop. Invisible join. [25]
Note: On Round 14, we will create the bobble stitches to make the arms.
Rnd 14: With orange yarn, starting on the invisible join, ch 1, 6 sc, 1 bobble-5-dc, switch to yellow yarn: 2 sc, 1 inc, 3 sc, switch to orange yarn: 1 bobble-5-dc, 11 sc (the last stitch should go into the same stitch as the first stitch where you pulled up the loop) [24]
Rnd 15 - Rnd 16: orange yarn: 8 sc, yellow yarn: 6 sc, orange yarn: 12 sc [26]
Cut the yellow yarn.
Rnd 17: 8 sc in orange, 1 bobble-5-dc in blue, 5 sc in orange, 1 bobble-5-dc in blue, 11 sc in orange [26]
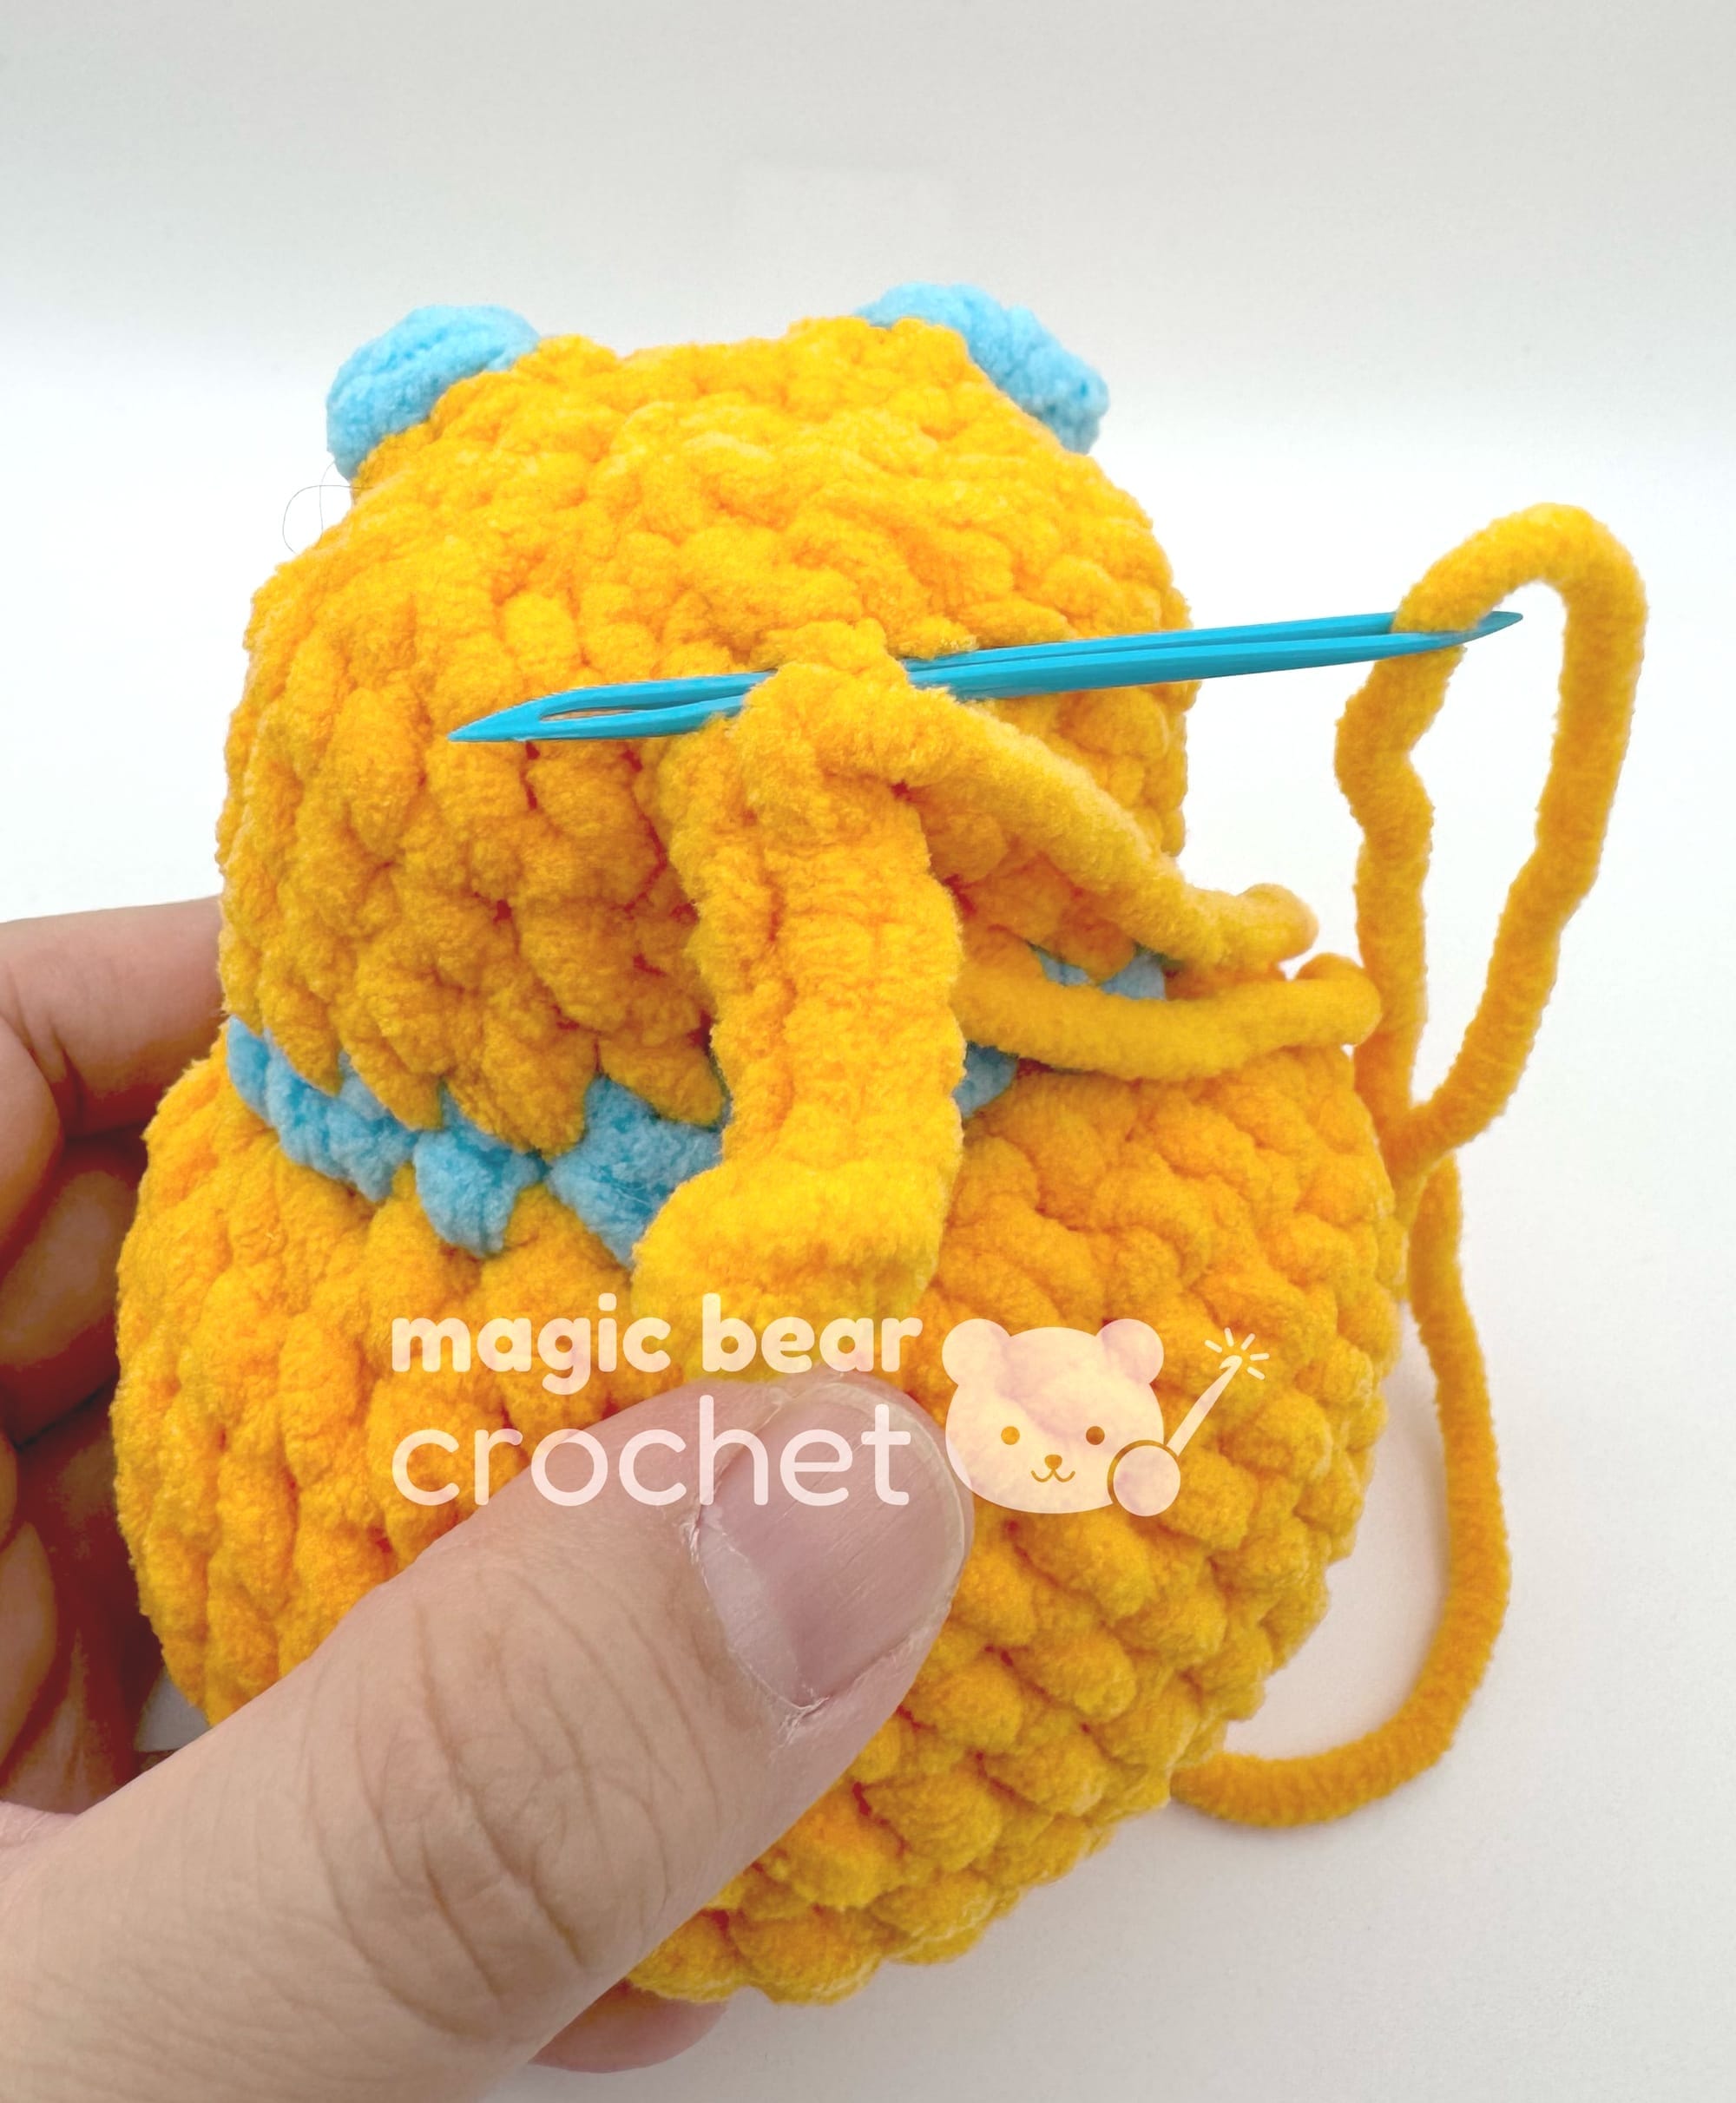
Cut the blue yarn. Tie knots with all yarn ends to fix in place. Stuff all ends into body.
Rnd 18: (1 sc, 1 dec) * repeat 8 times, 2 sc [18]
Stuff the body firmly at this point.
Rnd 19: 9 dec [9]
Fasten off, leave a long tail for sewing. Weave the yarn tail through the front loops of the last round and pull it tight to close the hole. Make a knot to make it more secure and hide the yarn tail inside the body.
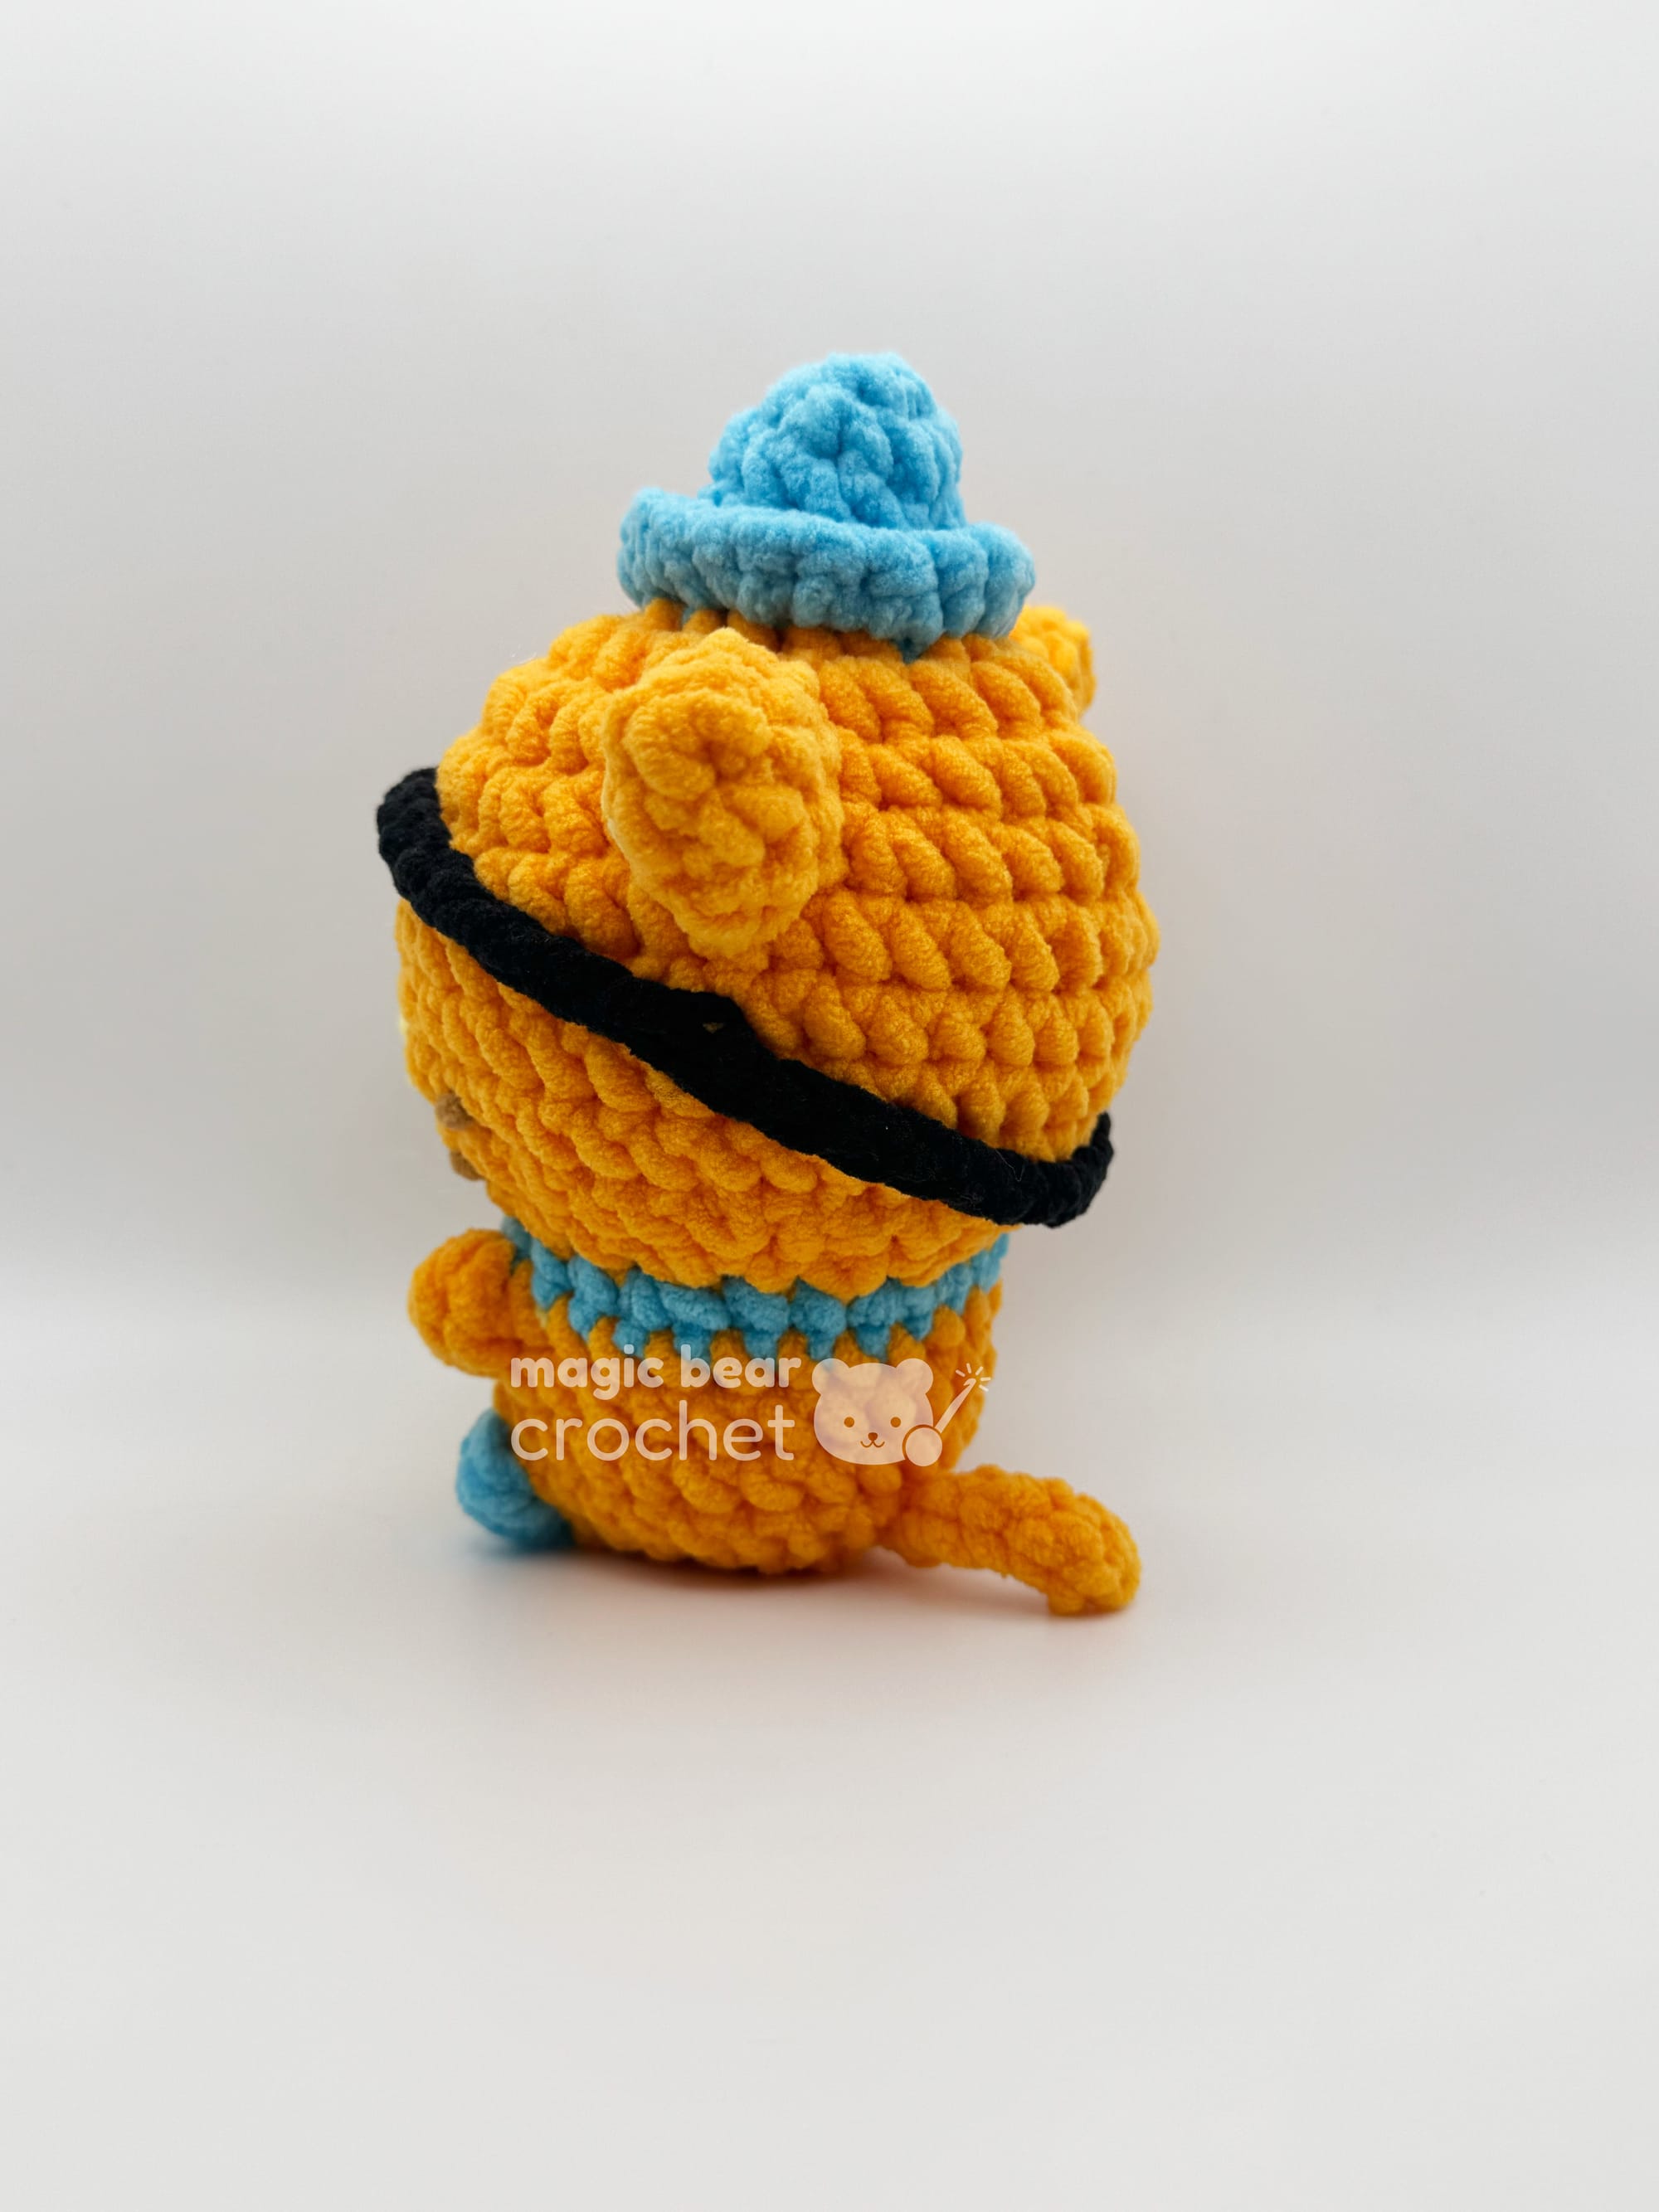
Tail
- Poke your hook through from Round 18 to Round 17 from the bottom, on the center back-most stitch.
- Pull up orange yarn and ch 7. Starting from second chain from hook, sl st 6.
- Cut yarn, leaving a 6 inch tail and pull through.
- With a needle, sew both ends into the body and out of the same stitch. Tie a double knot and hide ends inside body using crochet hook.
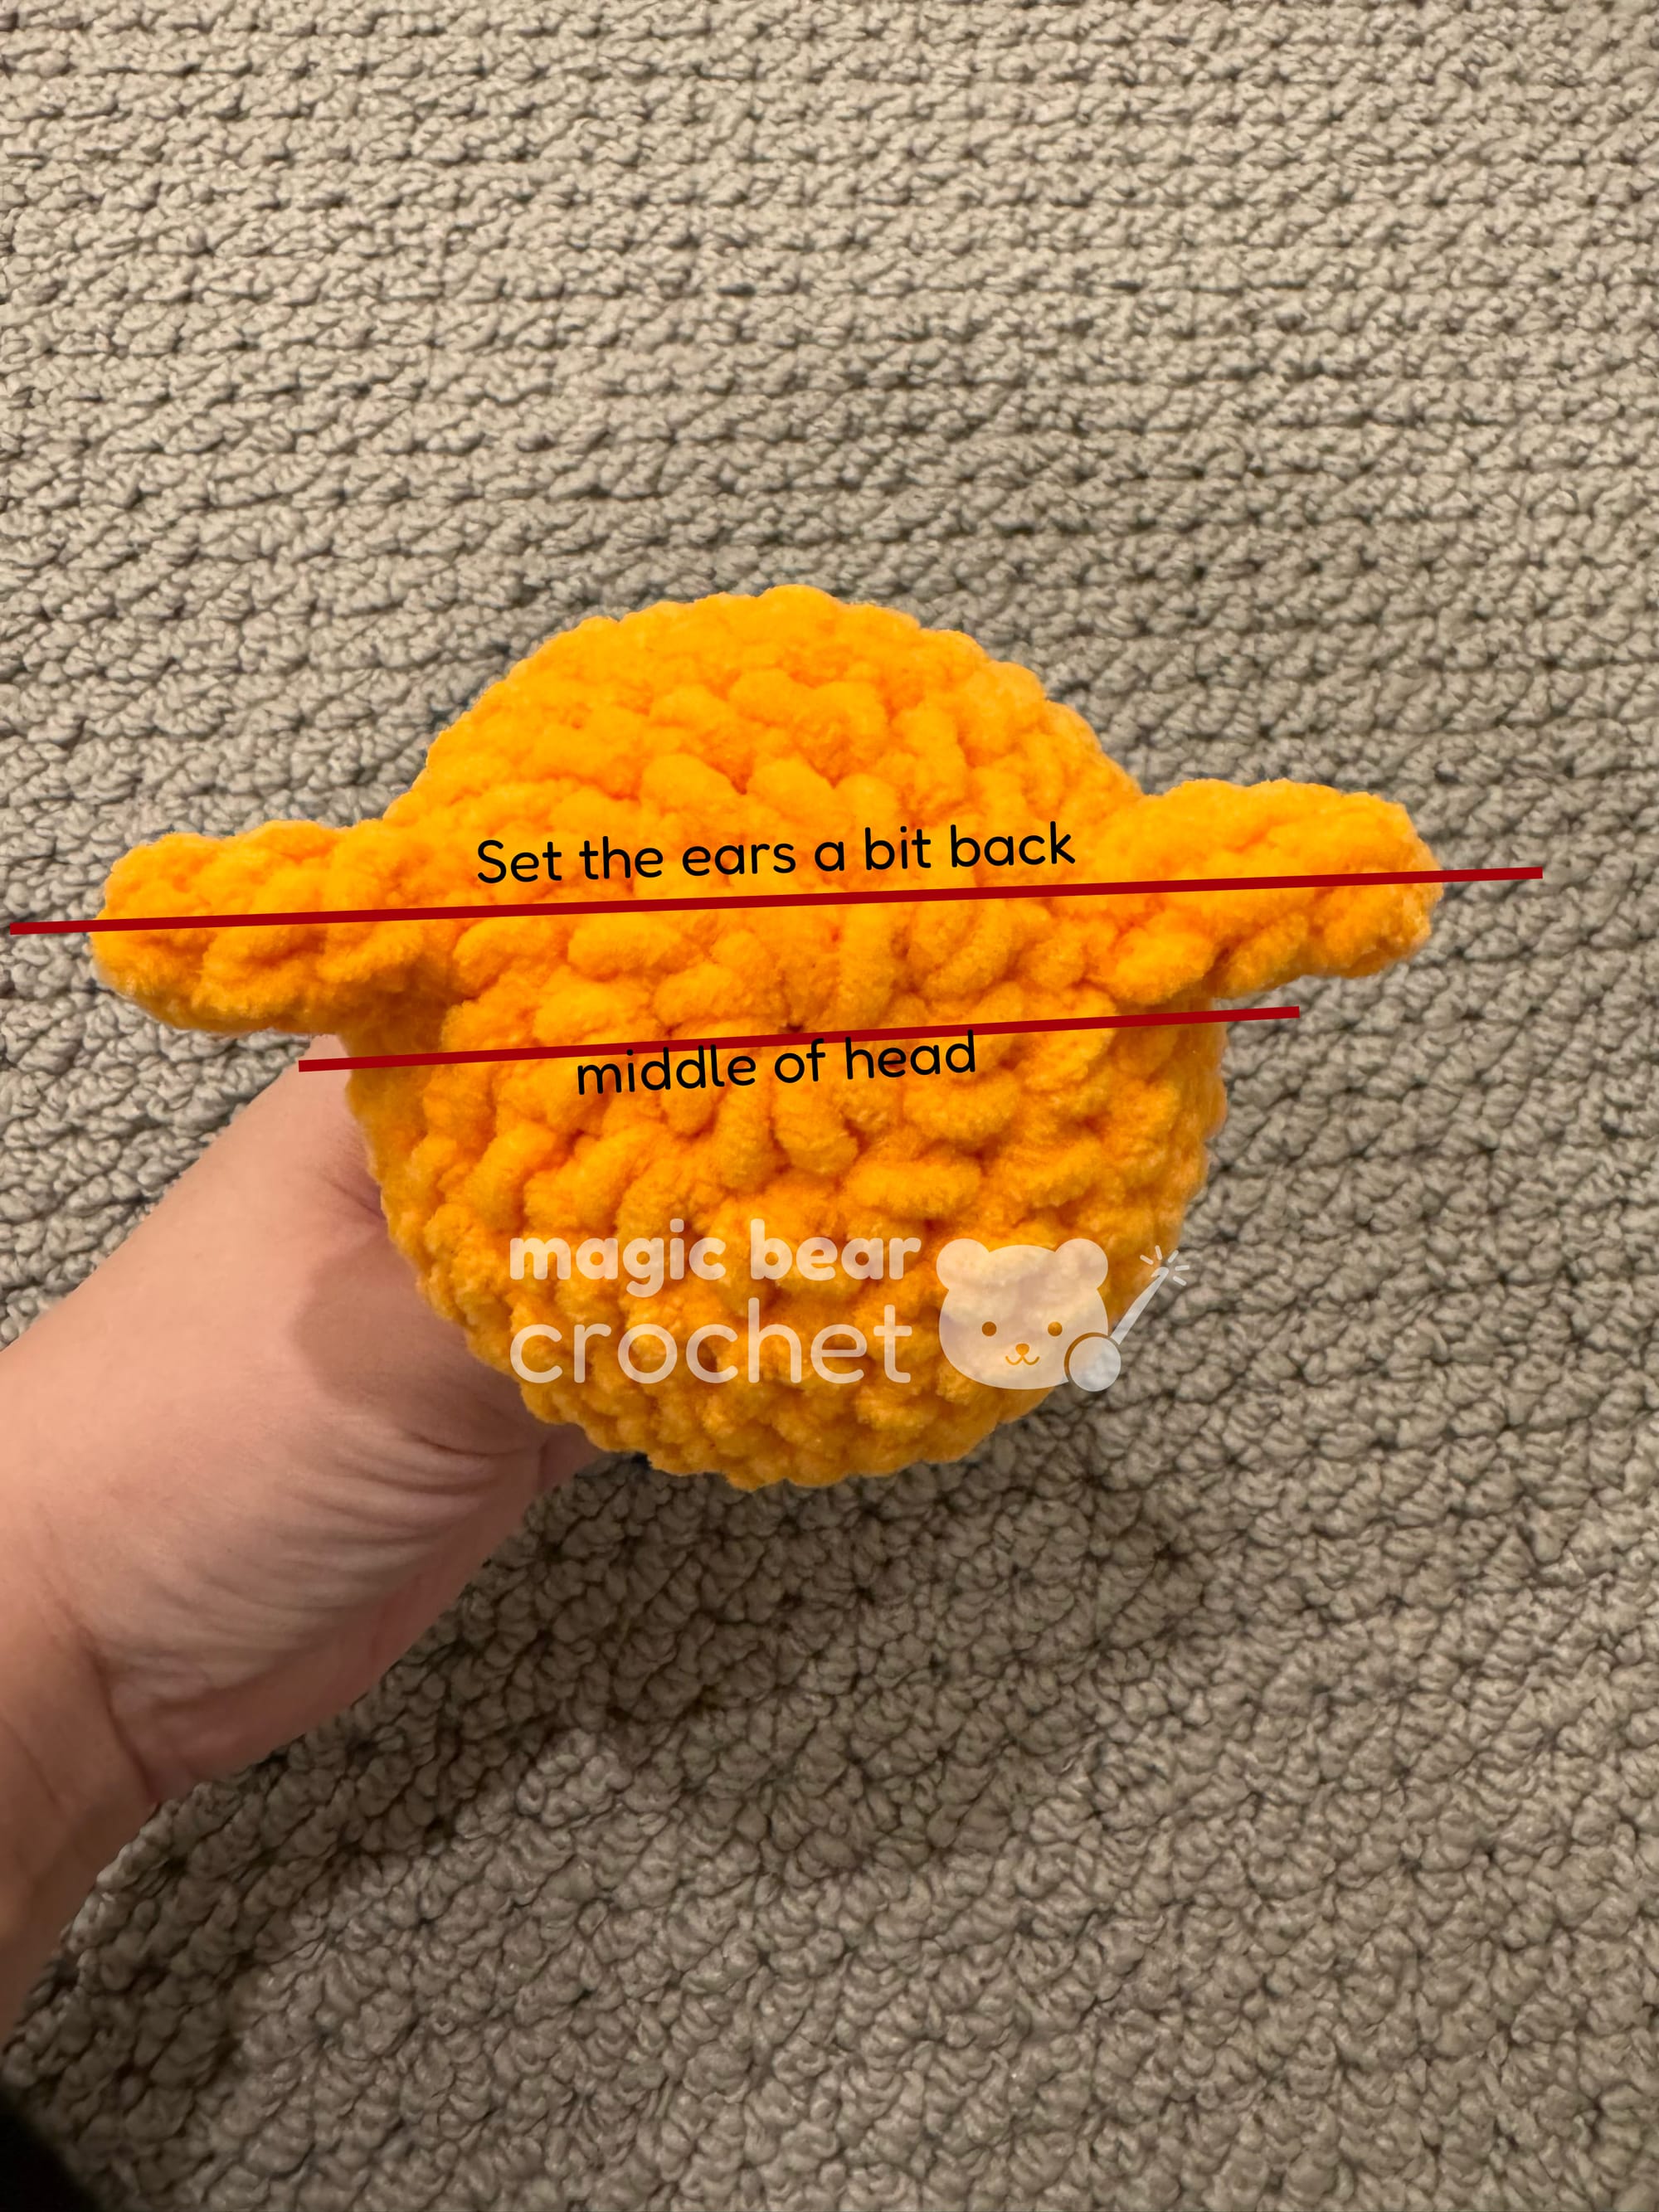
Ears (make two)
Rnd 1: 4 sc in magic circle [4]
Rnd 2: 4 inc [8]
Rnd 3: 8 sc [8]
Rnd 4: Leaving a tail at least 8 inch long, cut yarn and pull yarn through. Use invisible join to finish off.
Assembly: Fold ear in half and orient the ear so that the shorter side is facing the front. This will make the ear curve toward the face. Sew onto head using whipstitch. The top of the ear should be between rounds 3 and 4.
Embroider the inside of the ears with yellow yarn, create a burst shape, making sure the embroidery is only showing on the front of the ear.
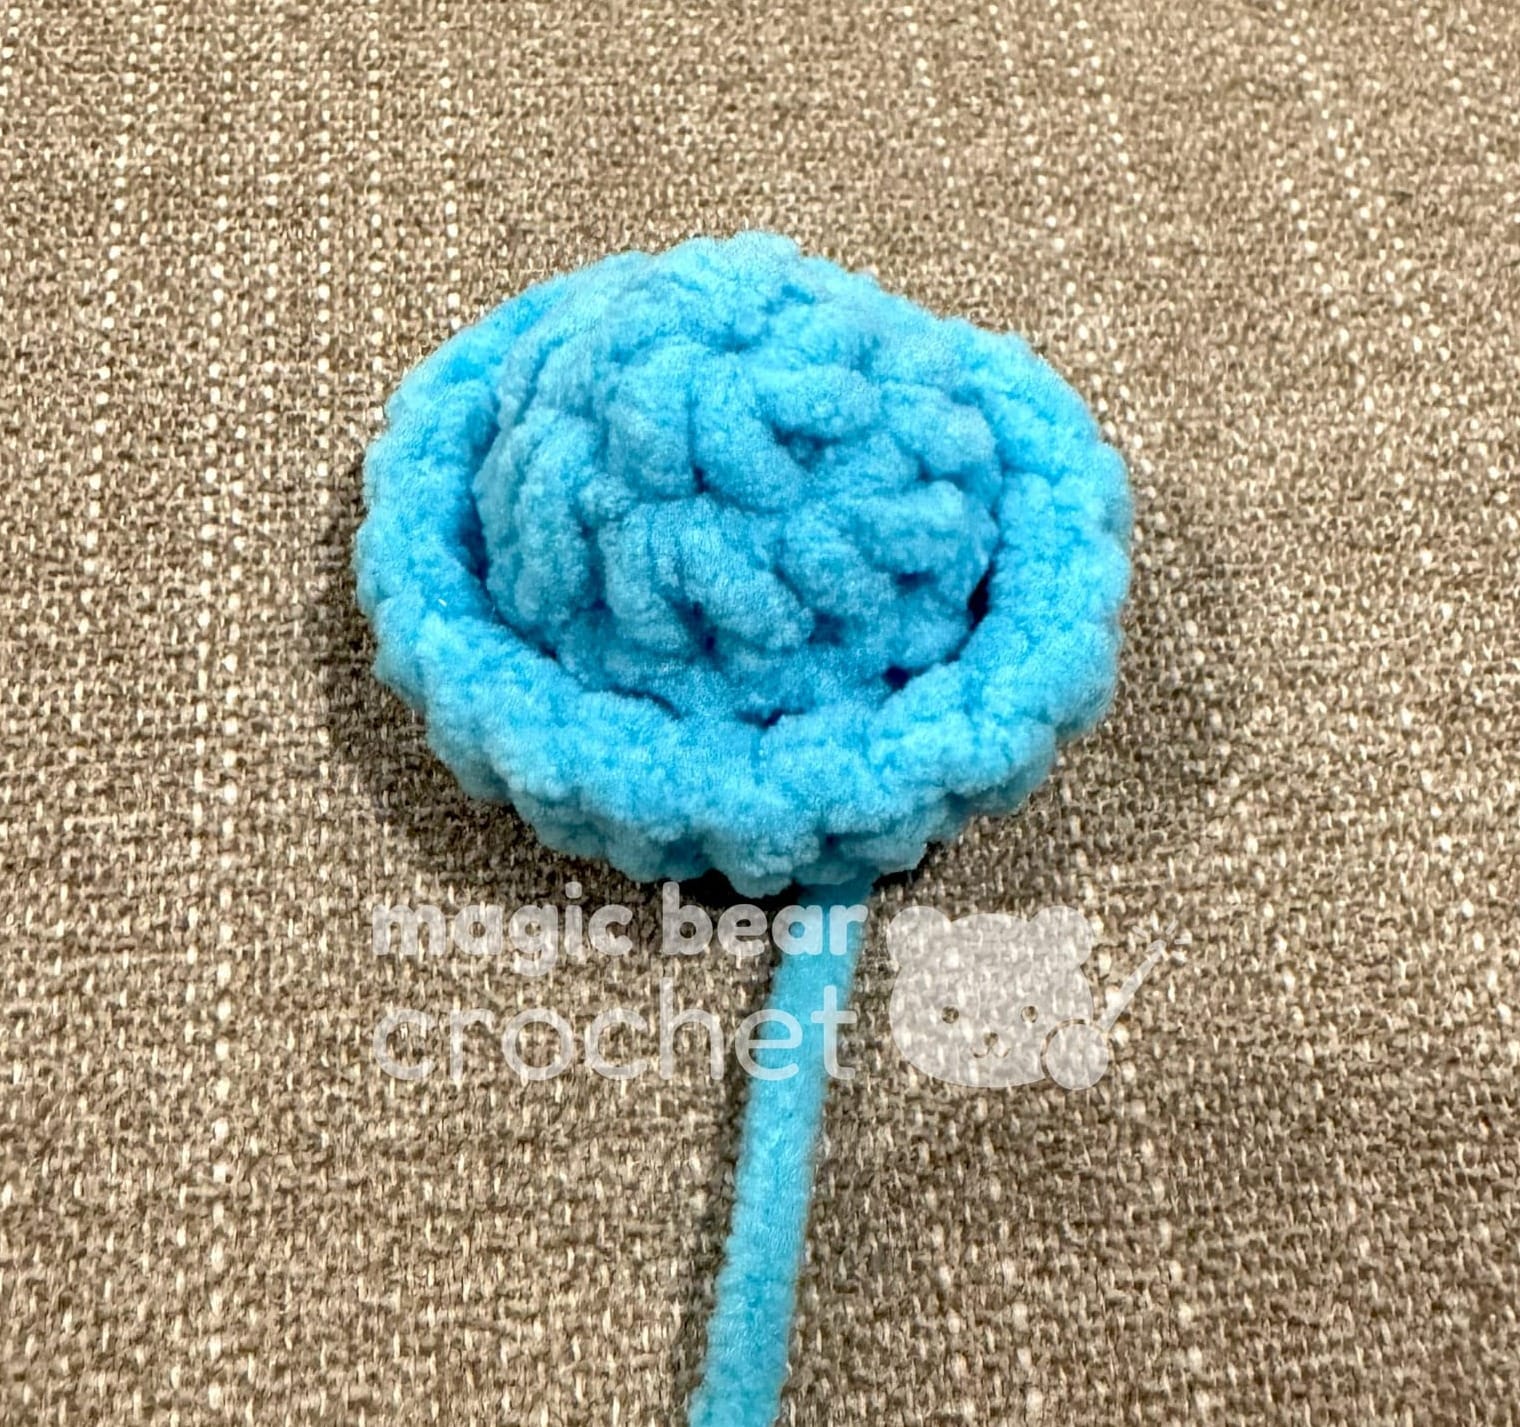
Hat
With blue yarn:
Rnd 1: 6 sc in magic ring [6]
Rnd 2: 6 inc [12]
Rnd 3: 12 sc [12]
Rnd 4: (2 sc, 1 inc) * repeat 4 times [16]
Rnd 5: 1 sc, 1 inc, (3 sc, 1 inc) * repeat 3 times, 2 sc [20]
Cut yarn, leaving a long tail, and invisible join.
Assembly: Flip the edges of the hat to make the brim. Sew onto top of head, aligning centers and pinning down.
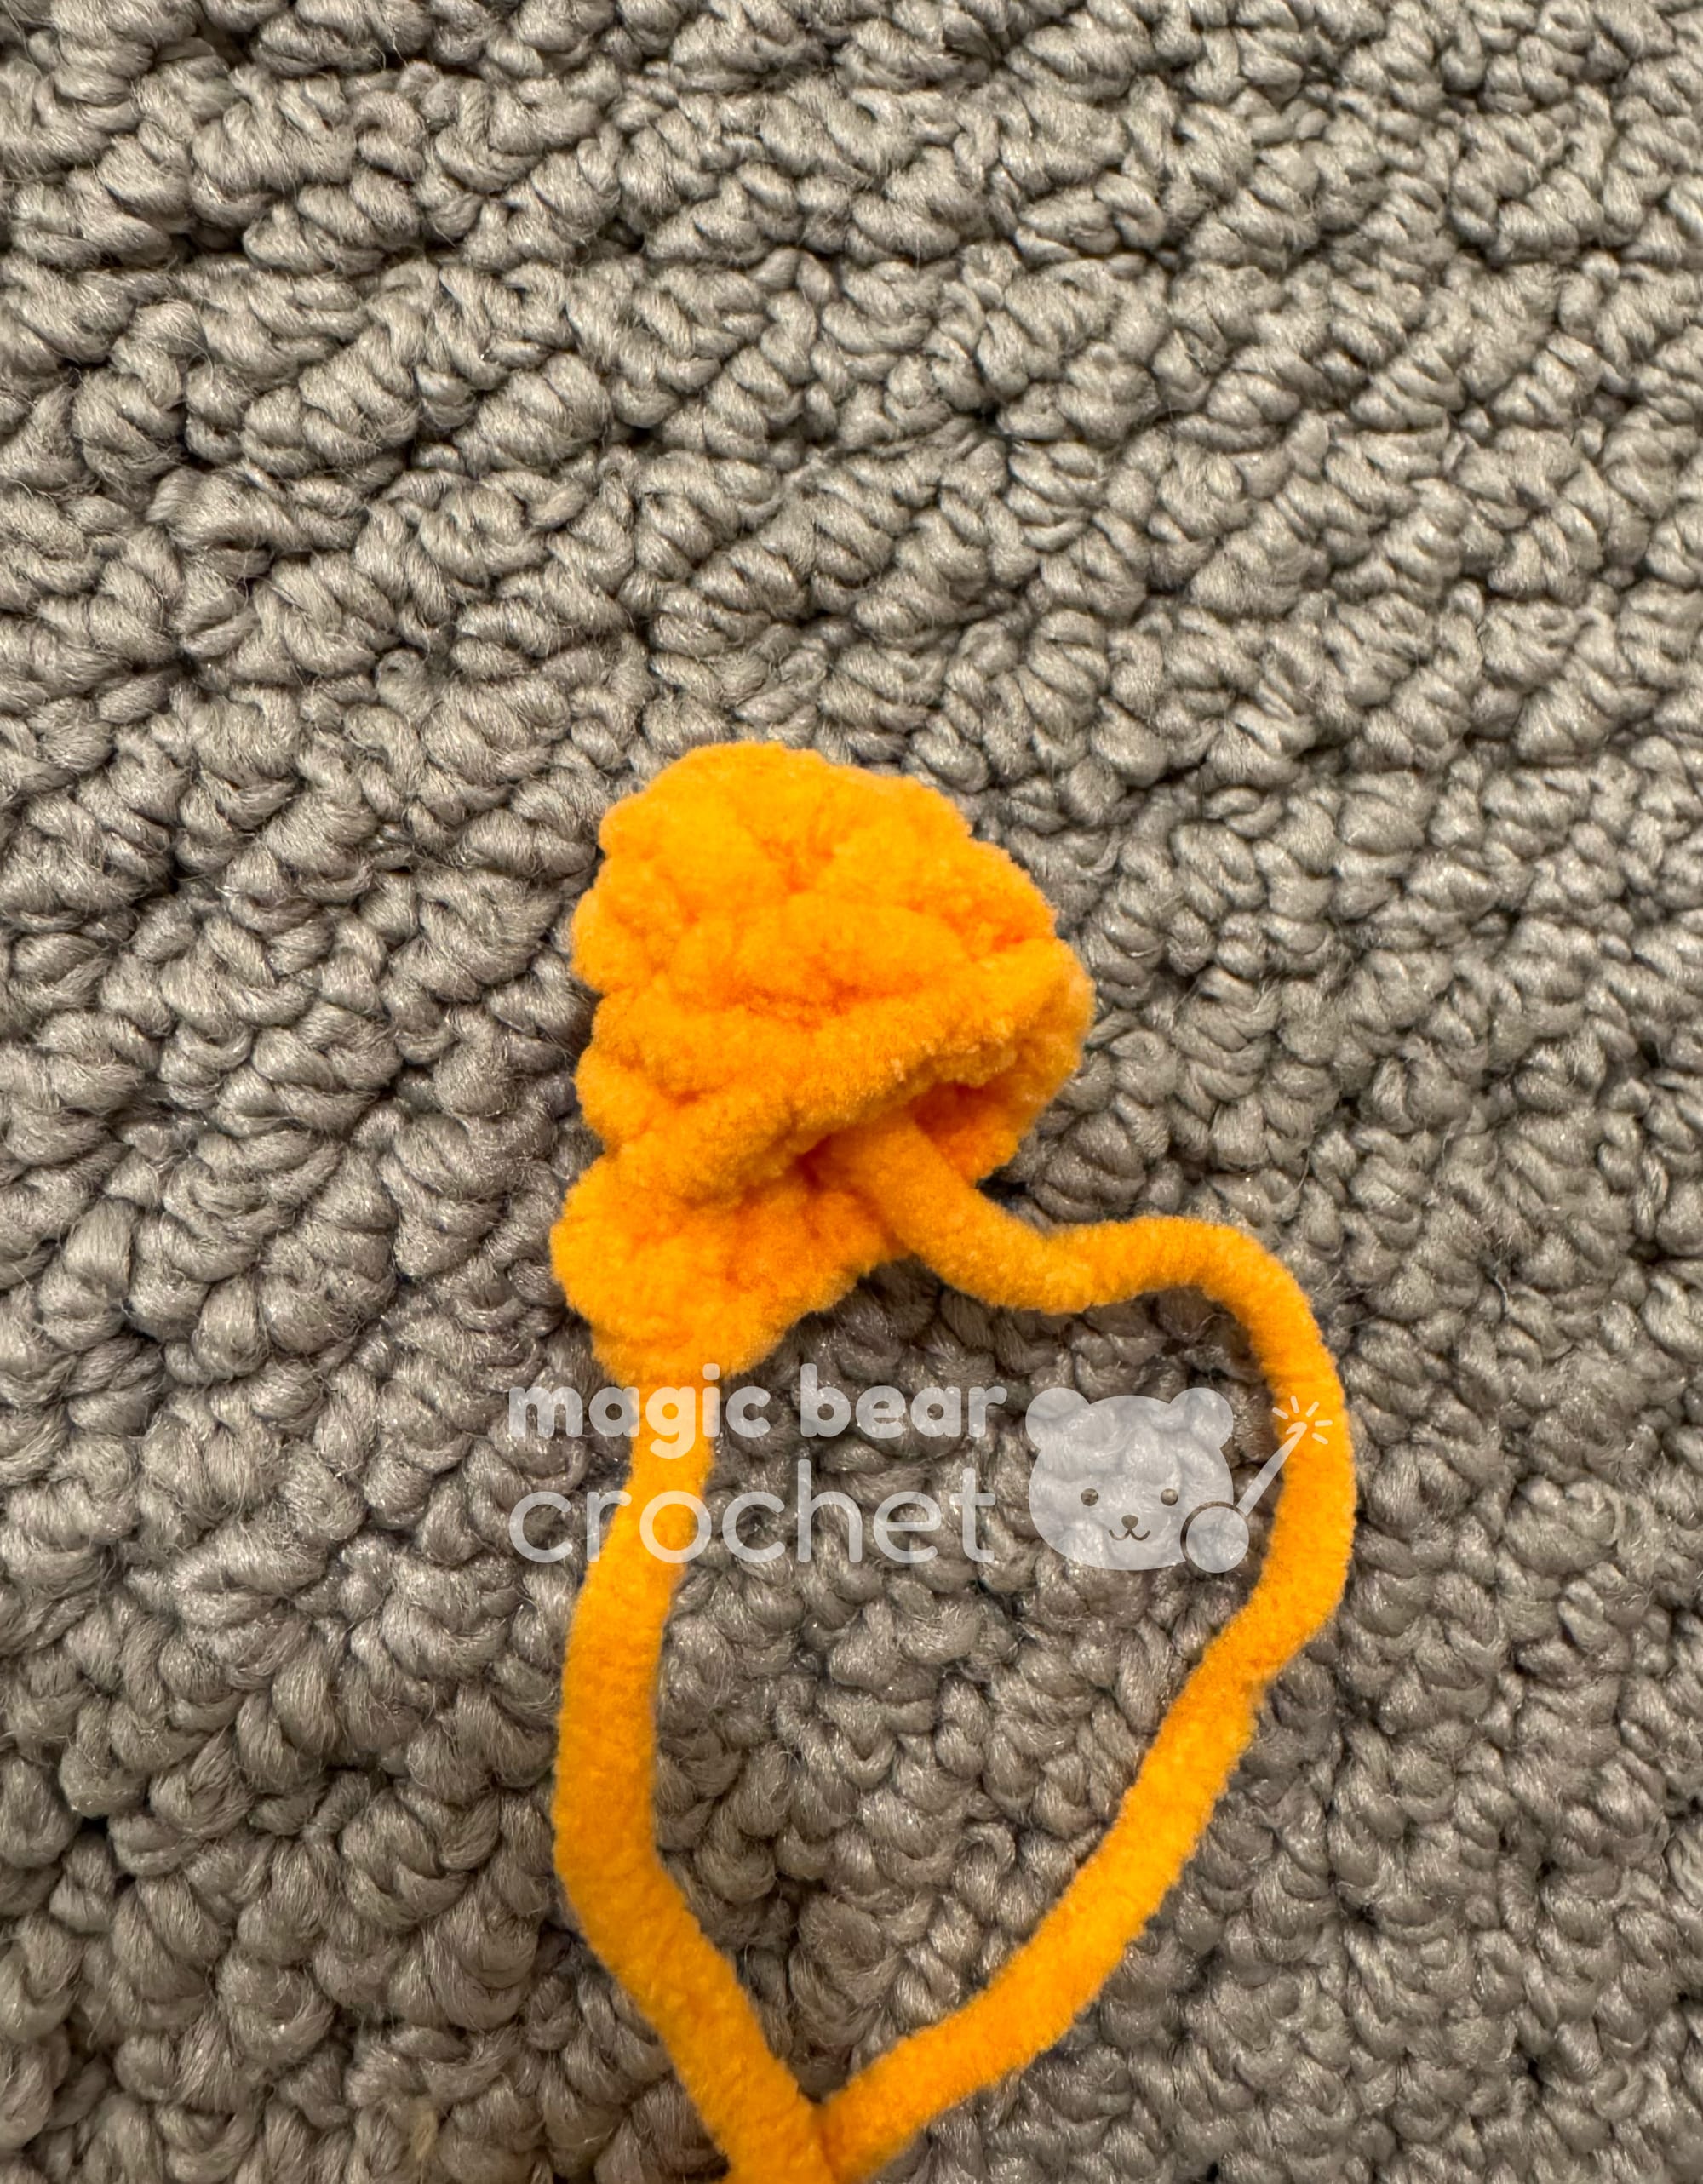
Eyepatch
With black yarn:
- Starting with an 8" tail, ch 7. In the 5th chain from hook, 3 dc.
- Skip 1, sl st into the last chain (first chain you made)
- Ch 13 (you may need to adjust this depending on how tight or loose your chains are). Position the eyepatch on Kwazii's right eye. Position the hook 1 stitch under the left ear. Sl st into the side of the head.
- Ch 14 (adjust as needed). Insert hook into 2 stitches under the right ear and sl st. (the strap of the eyepatch sits lower on the right ear).
- Ch 4. This chain should now meet the other side of the eyepatch. Cut yarn, leaving about 8" and pull the yarn through. Sew this end into the eyepatch and into the head.
- Using one of the two tails, sew the eyepatch into the head. Pull both ends of black yarn to the back of the head. Tie a double knot and hide inside the head.
Assembly Tips
- Stuff the head and body firmly but evenly to maintain shape
- When attaching ears, ensure they're symmetrical by counting stitches from center top
- The eyepatch should be positioned slightly angled for character
- Take time to secure all yarn ends well, especially at color changes
Care Instructions
- Spot clean only with a damp cloth
- Air dry completely if washing is necessary
- Store in a cool, dry place
- Avoid direct sunlight to prevent fading
Troubleshooting Guide
Common Questions:
- Bobble stitches look uneven: Make sure to pull the bobble stitches tight and maintain even tension
- Gap at color changes: Try to keep yarn snug when changing colors and weave in ends securely
- Eyepatch positioning: Mark position with stitch markers before sewing to ensure proper placement
Pattern Support
Need help? Contact me at:
- Email: magicbearcrochet@gmail.com
- Instagram: @magicbearcrochet
© 2024 Magic Bear Crochet. This pattern is protected by copyright law and is for personal use only. You may sell items made from this pattern in small quantities, but please credit Magic Bear Crochet as the designer. Mass production, distribution, or copying of the pattern itself is prohibited.